Hike Payment Reporting and Settings
Hike Payments Reports and Settings
This article explains how to access Hike Pay reports
and manage Hike Pay settings in Hike POS. These tools help you track
payments, reconcile transactions, and control how Hike Pay operates in your
store.
What is Hike Pay?
Hike Pay is Hike POS’s integrated payment solution that
allows you to accept card and digital payments directly through the Hike
system. It provides built-in reporting and configurable settings so you can
manage payments efficiently from one place.
Accessing
Hike Pay
Hike Pay give you visibility into your payment activity,
settlements, and fees.
How to
Open Hike Pay
- Log in to Hike POS
- Go to Hike Pay section
Here, you will find the Hike Pay screen where you’ll be able to go through the various reports and settings by clicking on the multiple tabs.
1. Transactions
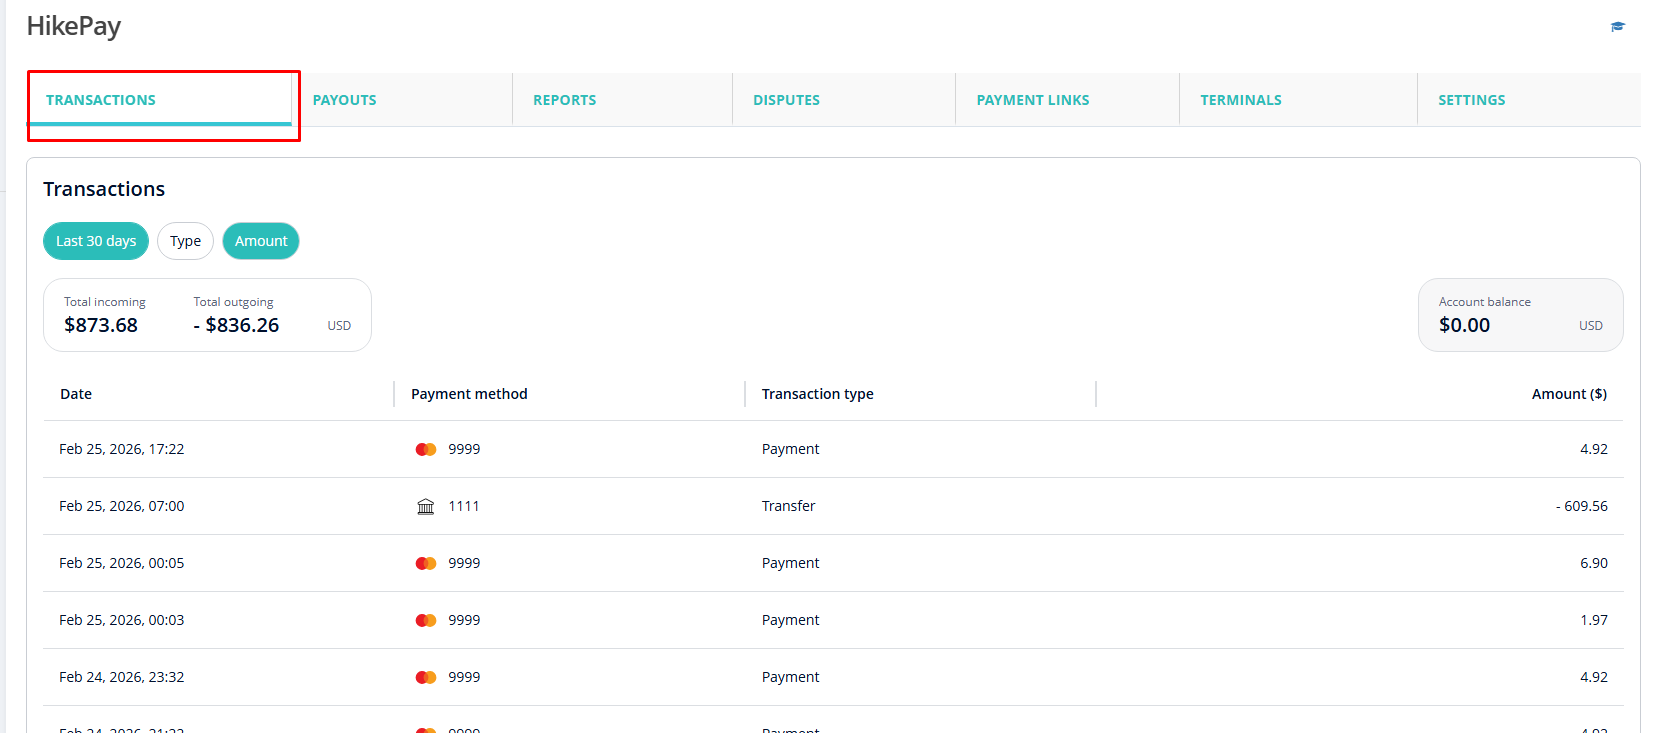
The Transactions Report provides an overview of Hike
Pay transaction activity within a selected time frame. It includes a detailed list of individual transactions, helping you review and
reconcile payments.
The Transactions overview summarises your payment activity for a selected period and provides tools to filter and analyses transaction data.
The Transactions overview summarises your payment activity for a selected period and provides tools to filter and analyses transaction data.
Filters
Use the filters at the top of the page to refine the
transactions displayed:
- Date Range (e.g. Last 30 days)
View transactions for a specific time period.
- Type
Filter transactions by type, such as payments, refunds, transfers, fees etc. - Amount
Narrow down transactions based on the transaction amount. Example: between $50 and $100.
These filters make it easier to locate specific transactions
or analyse trends.
Below these filters, you’ll see a summary of your transaction
totals for the selected period:
Transaction Summary

- Total Incoming
The total value of payments received through HikePay. - Total Outgoing
The total value of outgoing transfers, such as payouts. - Currency
Displays the currency used for transactions (e.g. AUD).
Account Balance
The Account Balance shows your current HikePay
balance, representing funds that are available or pending payout.
Transactions List
Each transaction is displayed in a detailed table with the
following columns:
Date
Shows the date and time the transaction was
processed.
Payment Method
Displays the payment method or source used for the
transaction, such as a card network or transfer reference.
Transaction Type
Indicates the type of transaction, such as:
- Payment – A customer payment received
- Transfer – A payout or fund transfer
Amount ($)
Shows the final transaction amount after fees.
- Positive values indicate incoming funds
- Negative values indicate outgoing fund
2. Payouts
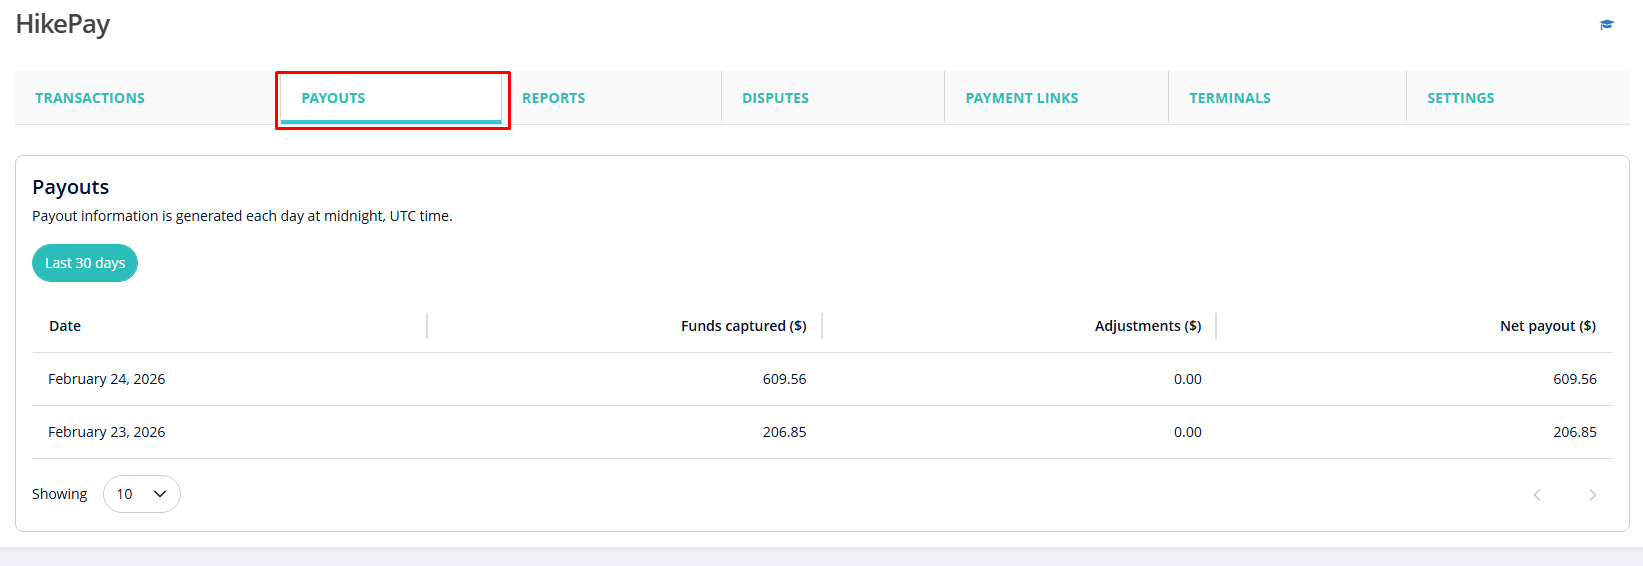
The Payouts report shows how and when your Hike Pay
transactions are deposited into your bank account. Each payout may include
multiple transactions processed over a period of time.
The Payouts page displays daily
payout information generated by HikePay and provides tools to review payout
history.
Note: Payout information
is generated once per day at midnight Coordinated Universal Time (UTC).
Transactions processed after this time will appear in the next day’s payout.
Please adjust and check your local time based on UTC for the Payout time.
Transactions processed after this time will appear in the next day’s payout.
Please adjust and check your local time based on UTC for the Payout time.
Date Filter
The same filter is added here where you can check the payout based on your requirements. Last 7 days, Last 30 days, This week, Last week etc.
The same filter is added here where you can check the payout based on your requirements. Last 7 days, Last 30 days, This week, Last week etc.
Use this filter to quickly view payouts generated within the most recent 30-day period.
This helps you:
- Review recent payout activity
- Track trends in captured funds
- Reconcile recent bank deposits
Payouts Table
Each row in the table represents
a daily payout summary with the following details:
Date
Shows the date the payout was
generated.
This corresponds to the day the
payout information was calculated, not necessarily the date funds appear in
your bank account.
Funds Captured ($)
Displays the total amount of
funds captured from customer payments on that day.
This includes all successfully
processed payments before fees and adjustments.
Adjustments ($)
Shows any adjustments applied
to the payout, such as:
- Refunds
- Chargebacks
- Manual corrections
If no adjustments were made, this
value will appear as $0.00.
Net Payout ($)
Indicates the final payout
amount transferred to your bank account.
This is calculated as:
Funds Captured – Adjustments =
Net Payout
Note: Understanding Your Payout
Timing
While payout data is generated
daily, the actual deposit timing depends on your payout schedule (standard or
same-day) and your bank’s processing times. Weekends and public holidays may
impact when funds appear in your account.
3.
Reports
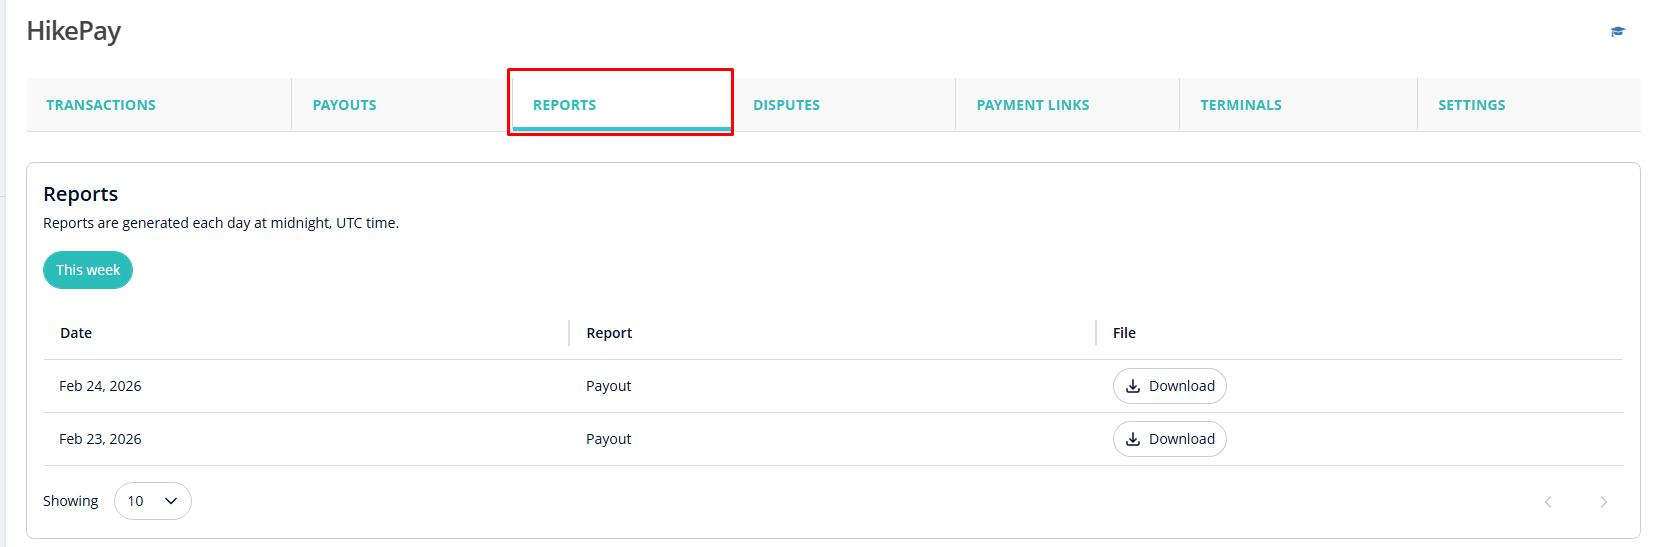
In this section, you can download daily
balance account payout reports. These reports are automatically generated every
day at midnight UTC.
Report Details:
- Date
The date of the payout.
- Report
The type of report. For payouts, this will be listed as “Payout”.
- File
Option to download the report. The report will be available in Excel format when downloaded.
4. Disputes
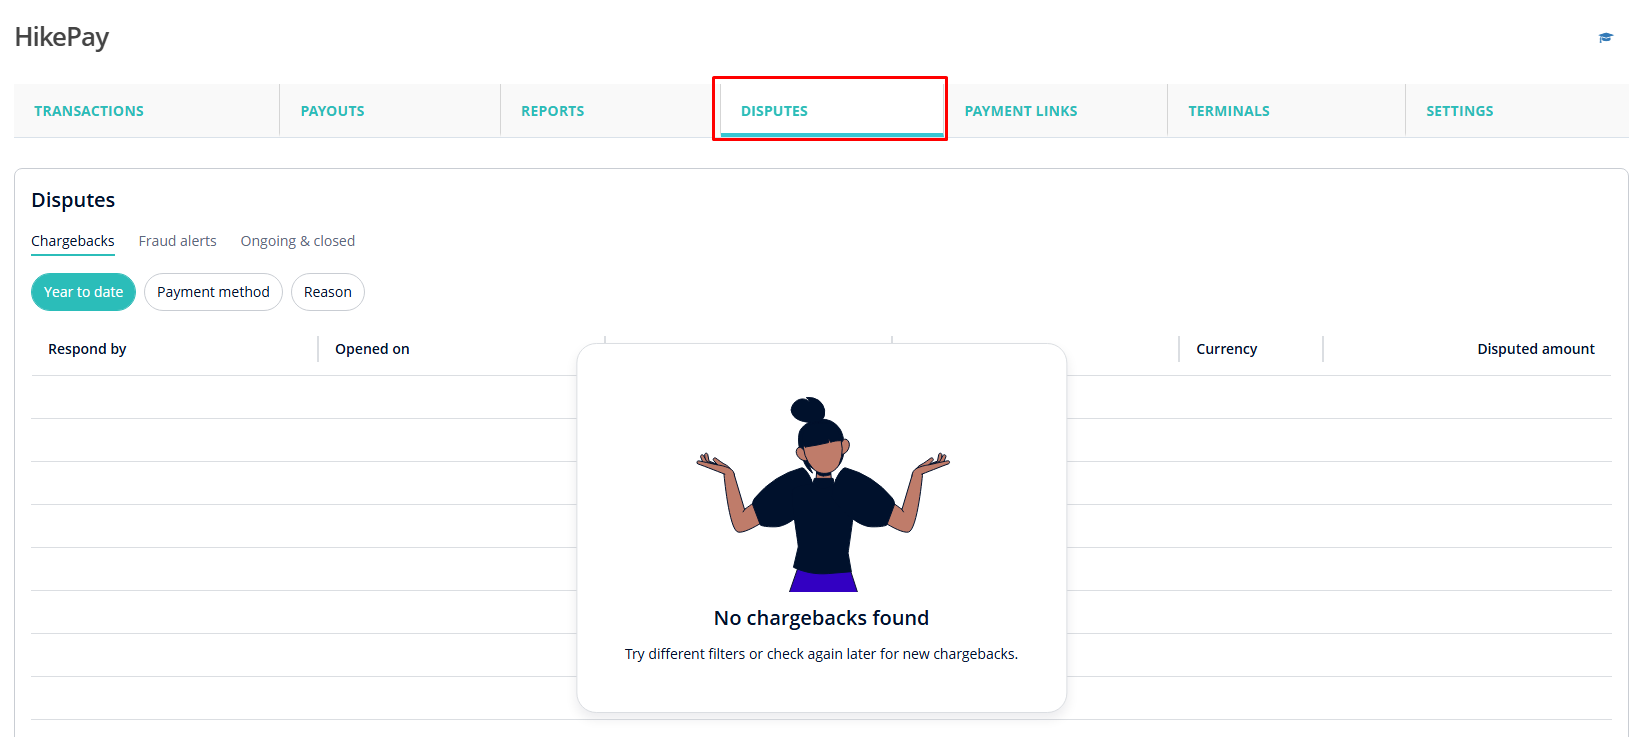
The Disputes page is designed to give you quick visibility into disputed transactions, along with tools to filter and review them efficiently.
The Disputes page is designed to give you quick visibility into disputed transactions, along with tools to filter and review them efficiently.
- Charge-backs
Displays disputes raised by customers through their bank or card provider. - Fraud alerts
Shows alerts related to potentially fraudulent transactions flagged by the payment network. - Ongoing & closed
Lets you view disputes that are currently in progress as well as those that have already been resolved.
Switch
between these tabs to focus on the type of dispute you want to review.
Filters
Filters
To help you narrow down results, the following filters are
available:
- Date filter (e.g. Last 30 days)
Quickly view disputes opened within a specific time period. - Payment method
Filter disputes based on how the payment was made (for example, card type or payment method).
These filters make it easier to locate specific disputes,
especially when managing a high volume of transactions.
Disputes table
All disputes are listed in a table format with key details
for each case:
- Opened on
The date the dispute was raised. - Payment method
How the original payment was processed. - Reason
The reason provided for the dispute (such as unauthorized error or customer dispute). - Currency
The currency in which the transaction was processed. - Total payment amount
The full transaction amount being disputed.
If there are no disputes matching your selected filters,
you’ll see an empty state indicating that there’s nothing to review at the
moment.
5. Payment Links
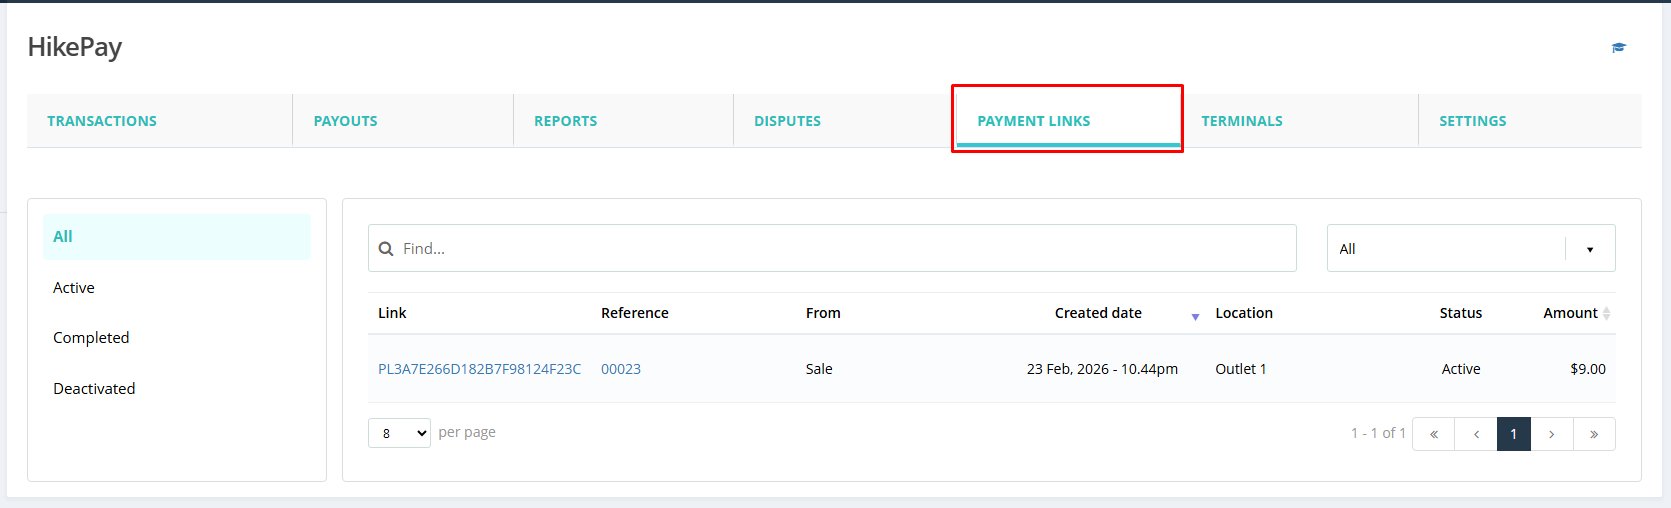
5. Payment Links
The Payment Links section in Hike Pay lets you
view and manage all payment links created through Hike POS.
Payment links allow you to accept payments remotely by sharing a secure link with your customers—perfect for phone orders, on-account sales, Invoices, or payments outside the store.
Payment links allow you to accept payments remotely by sharing a secure link with your customers—perfect for phone orders, on-account sales, Invoices, or payments outside the store.
Payment link statuses
On the left-hand side of the page, you can filter payment
links by status:
- All
Displays every payment link, regardless of its current state. - Active
Shows payment links that are currently active and can be used by customers to make a payment. - Completed
Displays payment links that have already been successfully paid. - Deactivated
Shows payment links that are no longer active and cannot be used for payment.
These filters help you quickly locate payment links based on
their current lifecycle.
Search and filters
At the top of the list, you’ll find additional tools to
refine your results:
- Search bar
Use the search field to find a specific payment link using its link ID or reference number. - Status filter (All dropdown)
Quickly filter payment links by status from the dropdown menu.
Payment links table
Each payment link is listed in a table with the following
details:
- Link
The unique payment link ID generated by Hike Pay. - Reference
The reference number associated with the payment. - From
Indicates where the payment link was created from (for example, a sale). - Created date
The date and time the payment link was created. - Location
The outlet where the payment link was generated. - Status
The current status of the payment link (Active, Completed, or Deactivated). - Amount
The payment amount associated with the link.
Selecting a payment link allows you to review its details
and payment status.
6. Terminals
The Terminals section in HikePay allows you to view, add, and manage all payment terminals linked to your HikePay account. This helps you keep track of your payment hardware, monitor activity, and ensure terminals are correctly assigned to your store.
Adding a New Terminal
Add Terminal
- Click + Add Terminal to add a new payment terminal.
- Follow the on-screen steps to register and link the terminal to your store.
Search & Filter Terminals
Find
- Use the Find search bar to quickly locate a terminal.
- You can search by serial number, model, or other terminal details.
Terminals Navigation Menu
On the left side of the screen, you’ll find the following
options:
Terminals
- Displays the list of all payment terminals added to your HikePay account.
- Shows device details and current status.
Each terminal listed in the table includes the following information: - ID
- A unique system-generated identifier for the terminal.
- Serial Number
- The manufacturer-assigned serial number of the terminal.
- Useful for identification and support queries.
- Model
- Displays the terminal model in use.
- Last Activity
- Shows the most recent activity recorded on the terminal.
- Helps confirm whether the terminal is actively being used.
- Firmware
- Indicates the firmware version currently installed on the terminal.
- Ensures your device is running supported software.
- Store ID
- Shows which store the terminal is assigned to.
- Useful when managing multiple store locations.
- IP Address
- Displays the network IP address of the terminal.
- Helpful for troubleshooting connectivity issues.
Tap to Pay
- Lists devices enabled for Tap to Pay functionality.
- Allows you to track soft POS devices that accept contactless payments.
Each terminal is displayed in a table with the following key fields: - Payment Name
- This is the name of the terminal used to identify it within your store.
For example, Hike Pay may represent a Tap to Pay terminal assigned to a specific device or location. - Tip: Use clear and descriptive names if you have multiple terminals (e.g. “Front Counter” or “iPad – Store A”).
- Status
- The Status indicates whether the terminal is ready to accept payments.
- Common statuses include:
- Configured – The terminal is set up and ready for use
- Not Configured – The terminal requires setup before accepting payments
- Always ensure your terminal shows Configured before processing transactions.
- Type
- This field shows the terminal type associated with the payment method.
- Example:
- HikePay Tap to Pay – Indicates a contactless Tap to Pay terminal
- This helps you quickly identify how payments are being accepted.
Orders
- Displays orders processed through HikePay terminals.
- Helps in reviewing terminal-based transactions.
Search Bar
Use the Find search bar to
quickly locate specific orders by:
- Order number
- Reference details
This is especially useful when
managing high transaction volumes.
Click the column header to sort
orders in ascending or descending order
The Orders page displays transaction details in a table format. Each column provides key information about individual terminal payments.
The Orders page displays transaction details in a table format. Each column provides key information about individual terminal payments.
- Ordered Date
- Shows the date the order was created or when the payment was processed through the terminal.
- Use this column to track transactions by date
- Order No
- Displays the unique order number generated for each transaction.
- This number is useful for:
- Identifying specific payments
- Customer support queries
- Cross-checking with POS orders
- Amount
- Indicates the total amount charged for the order.
- Includes the final payable amount
- Useful for daily reconciliation and financial review
- Reference
- The Reference field displays payment-related identifiers such as terminal or transaction references.
- This is helpful when:
- Matching payments with bank settlements
- Investigating disputed or failed transactions
- Status
- Shows the current payment status of the order.
- Common statuses may include:
- Successful – Payment completed successfully
- Pending – Payment is being processed
- Failed – Payment did not go through
- Always check the status to confirm whether funds were captured successfully.
When No Records Are Found
If you see a “No records found” message:
- No terminal orders have been processed yet, or
- Filters/search terms may not match existing records
Try clearing the search field or adjusting the date range.
8. Settings
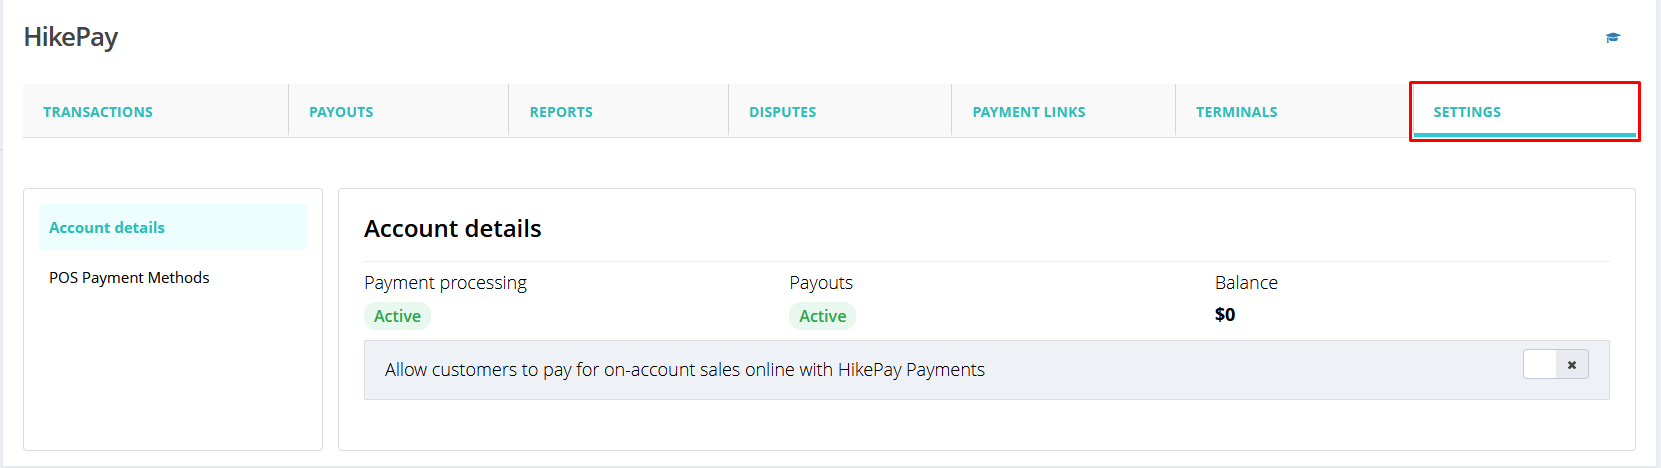
The Settings section in HikePay allows you to manage your account configuration, payment capabilities, payouts, and customer payment options. This is where you can view your account status and control how HikePay works across your store.
Settings Menu Overview
The Settings section in HikePay allows you to manage your account configuration, payment capabilities, payouts, and customer payment options. This is where you can view your account status and control how HikePay works across your store.
Settings Menu Overview
The Settings page is divided into the following sections:
- Account details
- Payouts Methods
- Online Payment Methods
Select any option from the left-hand panel to view or update
related settings.
Account Details
The Account details section provides a summary of
your HikePay account status and payment capabilities.
Payment Methods
The payment methods available with HikePay payment type are:
- American Express
- Mastercard
- Visa
- Maestro
- China UnionPay
- Diners
- Discover
- EFTPOS Australia
- JCB
- Ali Pay
- Wechat Pay
Please note: To enable Alipay or WeChat Pay as a payment method in Hike Pay, please contact your Account Manager. They will provide details regarding the applicable transaction fees and assist with the activation process.
Payment Processing Status
This indicates whether your store is currently able to accept
payments via HikePay.
- Active – Your account is approved and can process payments
- Inactive – Payments are currently unavailable and may require setup or verification
Payouts Status
Shows whether payouts to your bank account are
enabled.
- Active – Funds will be paid out according to your payout schedule
- Inactive – Payouts are paused or pending setup
Balance
Displays your current HikePay balance, which reflects
funds that are pending payout.
This amount updates as payments are captured and payouts are
processed.
On-Account Online Payments Setting
Allow customers to pay for on-account sales online with
HikePay Payments
This toggle lets you control whether customers can pay
outstanding on-account balances online using HikePay.
- Enabled (✔) – Customers can make online payments for on-account sales
- Disabled – Online payment for on-account sales is not available
This feature is especially useful for:
- Businesses offering customer accounts or credit
- Reducing manual payment follow-ups
- Improving cash flow with faster online payments
Changes to this setting are applied instantly.
Payout
Payout
The Payouts page displays the payout methods available for
your HikePay account and the schedule used to transfer funds to your bank.
Same-day Payouts
If enabled, Same-day Payouts allow you to receive
eligible HikePay funds in your bank account on the same business day.
Key points to note:
- Availability depends on your account eligibility
- May be subject to additional fees
- Same-day payouts are processed on business days only
If this option is not enabled, payouts will follow the
standard schedule.
Standard Payout Schedule (1–3 Business Days)
By default, HikePay uses a standard payout schedule,
where funds are transferred to your bank account within 1–3 business days.
Important details:
- Payouts are processed on business days only
- Funds are not deposited on weekends or regional bank holidays
- The timing may vary depending on your bank
This schedule ensures reliable and consistent settlement of
your HikePay transactions.
Managing Your Cash Flow
Understanding your payout schedule helps you:
- Plan daily and weekly cash flow
- Track when funds will appear in your bank account
- Align payouts with accounting and reconciliation processes
For detailed payout timelines, click Learn more about
your payout schedule within the Payouts section.
Payment Methods
Each payment method is displayed in a table with the following key fields:
Each payment method is displayed in a table with the following key fields:
Name
Displays the card network or payment method available
through HikePay.
Examples include:
- Mastercard
- Visa
- Maestro
- American Express
- China UnionPay
- Diners
This helps you understand which cards your customers can use
at checkout.
Transaction Fee
Shows the processing fee charged for each payment
method.
- Fees are displayed as a percentage (e.g. 1.5%, 2.5%)
- Fees may vary depending on the card network
- Transaction fees are automatically deducted during settlement
Refer to this column to understand your processing costs for
each payment type.
Active Status
Indicates whether a payment method is currently enabled
or disabled.
- ✔ Active – The payment method is enabled and available to customers
- Activate – The payment method is available but not yet enabled
To enable a payment method, click Activate next to
the desired option.
Enabling or Disabling Payment Methods
- You can enable additional payment methods at any time by selecting Activate
- Enabled payment methods are immediately available across supported HikePay terminals and checkout flows
- Disabling a payment method will prevent customers from using that card type for future transactions
Related Articles
Tips for Payment & Tax Mapping in Hike–QuickBooks Online (QBO) Integration.
Proper mapping of payments and taxes ensures smooth syncing between Hike POS and QBO. Incorrect mapping can cause misreported transactions or errors during sync. ✅ Payment Mapping Tips Check QBO Payment Accounts Log in to QuickBooks Online. Navigate ...Configuring your Store Settings
Once you have signed up to Hike and entered in your store details, the first thing you’ll want to do is configure your store settings. This means, going through the various settings as set by Hike, to get your store ready. This includes things such ...How to Manage QuickBooks Online Plus - Sync Settings
Hike enables you to integrate with QuickBooks Online Plus* to manage inventory, customers, suppliers, and purchase orders. *Note: Intuit QuickBooks offers a range of online services, but only QuickBooks Online Plus allows integration with Hike. When ...Introduction to Hike ecommerce
Hike eCommerce: Your All-in-One Online Store Add-On for Hike POS Welcome to the future of unified retail! This help article will guide you through everything you need to know about Hike eCommerce, the powerful online store add-on that seamlessly ...Performing Sales in Hike
Different businesses will undoubtedly have different ways in which they conduct sales. From utilizing functions such as Lay-By to allowing your customers to pay for goods in installments or enabling on-the-spot discount sales for those specially ...