Understanding your Reports on Hike
Understanding the ins and outs of your business, from what items are selling the best to how well your staff are performing, is vital information for any business to know. Indeed, reports are where retailers will how to better improve their store operations and as such having a built-in reporting system that accurately displays your data is essential.
To that end, Hike affords its customers a sophisticated reporting system that enables retailers the option to view real-time statistics of their:
- Sales
- Inventory
- Cash Register
- Payment Types
- Customers
Essential plan users have access to all our basic reporting functions, but our Plus plan users will be able to customize their reports even further with filters. Grow your business today with Hike POS reporting functionality, to get the most out of your business.
Reporting Measures
Brimmed to the top with information pertinent to a specific part of your business operations, no two reports are the same in Hike POS. However, a constant throughout all your reports remains how your reports are measured.
Indeed, Hike offers our Plus plan users three distinct ways in which to measure reports, which we’ll go through here.
Filtering Reports by Sales & Inventory (Advanced)
A reporting feature available to only our Plus plan users is the ability to filter your Sales or Inventory reports by one or more products, brands, product types, suppliers, seasons or tags to filter your results.
This is a great way to drill your reporting right down to the specific detail.
To begin, select Reporting from your Hike menu and navigate to the Sales screen.
This is your Sales Reporting screen, and one of the first things you’ll notice is the filter search bar at the top.
Enter the name of the product or its associated features, into the search box and Hike will populate with a list of items, that you can select.
Once you have selected the necessary items, Hike will automatically generate reports filtered to those items. These can be quite useful in situations when you want to see exactly how well a product is performing (or isn’t) and make adjustments on your inventory as a result.
Note: The filter function is only available for those that are ‘Plus’ plan users and only works for the Sales and Inventory Reports.
Sales by Outlet
If you have multiple outlets connected to Hike, managing and analyzing reports has become easier. Now, instead of choosing just one outlet or all outlets, you have the flexibility to select a single outlet, multiple outlets, or all outlets using checkboxes.
To get started, simply click on the store icon beside date range selection box. A list of all your connected outlets will be displayed, allowing you to select exactly what you need. Whether you’re reviewing the performance of a single location or comparing multiple stores, the choice is yours.
Keep in mind that when selecting more than three outlets or extending the timeframe beyond three months, the report won’t be displayed on the screen. However, you can still export the data for further analysis. If this applies to your selection, a notification will appear to inform you as shown in below screenshot.
Sales by Date Range
Another option you will be able to edit is the date-range. Hike will automatically default with the Today’s date and sales for all your reports, but you can specify the date-range by clicking on the button.
Hike gives you the following options when selecting the time-period of your reporting. Click APPLY once you have selected the one you want.
For Custom Range, you will be given a Calendar where you can select across months (even years) & time of available data. Once you have selected the start and end dates, click Apply. Hike will then display reports on the dates you have entered.
Sales Reporting
One of the primary functions of any business, is to get full-breakdowns of their retail sales. Sales Reporting offers retailers just that, but beyond just simple tasks like calculating the totals sales of the day or the gross profit, Hike POS provides a robust overview of all aspects of their store including:
- Sales Summary
- Sales (by Items)
- Sales Transactions
- Laybys
- By Category
- Registers
- Users
- Customer Groups (Tiers)
- On Account
- Custom Sale
On this page, we’ll go through exactly what each report means and how to read them on Hike.
To begin, select Reporting from your Hike menu and navigate to the Sales screen.
Here, you will find the Sales Report screen where you’ll be able to go through the various reports by clicking on the multiple tabs.
Remember, you can always customize and filter your reports by using our Reporting Measures.
Let’s now look at those reports in a bit more detail.
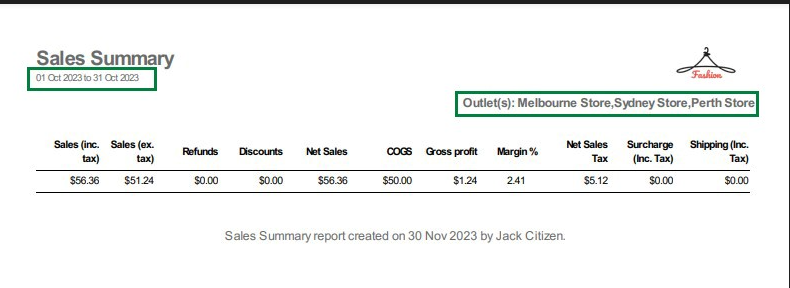
Sales Summary Report
Based on your selections (date, outlet, filters), the Sales Summary Report gives you a graph of the total revenue received within a selected time frame. This is useful in giving retailers a quick, and easy to understand sales summary. Useful in comparing the performance of a store over days, weeks or months.
Sales (inc. Tax)
Amount of sales business received, including tax.
Sales (ex. Tax)
This is the amount of money that your store actually received. Includes discounts, refunds, cash/card/gift-card payments, and on-account transactions
Cost of Goods Sold (COGS)
The cost price of the goods, before tax.
Gross Profit
Your Gross Profit is equal to your revenue minus the COGS.
Gross Profit = Revenue - COGS
Margin %
Your Margin % refers to the difference between the cost for acquiring products and the selling price.
Refunds
How many refunds your store conducted over the time-period.
Tax Collected
The tax collected on sales.
Net Sales
Total sale including tax. This amount does not include the refunds.
Discounts
The total value of Discounts that were applied to sales during the time period.
At the bottom of the Sales Summery report, you can check the summery for each day's sales as per selected time period. I.e. if you select 7 days as time period, you will see sales summery for last 7 days.
Sales (By items) Report
The Sales (by Items) report, gives retailers a list of details on the sales of individual products in the store. Whilst you can navigate your entire catalogue using the page numbers, you can also use the search box to only display details of a product being sold. This is useful when you need a breakdown on a specific product, using it to gauge how you position that product in your store moving forward – e.g. promote it further if selling well, discontinue it if not.
Item
This is the product name of the item sold, and whose row indicates the sales figures. This will also include the Serial number of the product, if included. For the Serial number enabled products, a link is provided. When you click on the link, a slider will open and list all the S/Ns of the products sold.
SKU
SKU of the product sold.
Barcode
Bar-code of the product sold.
Quantity Sold
The number of products/items sold within the time-frame specified.
Sales (ex. Tax)
This is the amount of money that your actually business received for the product. Includes discounts, refunds, cash/card/gift-card payments, and on-account transactions
Purchase Cost
The cost price of the goods, before tax.
Gross Profit
Gross Profit = Revenue - COGS
Margin %
The difference between the cost for acquiring products and the selling price, as a percentage.
Layby Report
The Layby report lists the details of transactions that customers have put on layby and how much they have remaining (to pay off). Each Layby transaction will be reported separately, i.e. if the customer puts an item on layby, then puts another item on layby, each order will be listed separately.
Use the search box to filter details of a customer’s transaction number and/or their name within the date range selected.
Order #
The is the reference number for your layby transaction.
Date
The date the order was first put on layby
Customer
The customer the layby is assigned to.
Order Total
The original amount of the layby
Outstanding
The remaining amount of the layby to be paid.
By Category Reports
Here, you will be able to view all your reports via their category, i.e. Product Types, Suppliers, Brand, Tags, season and Products with serial numbers.
This is of course convenient, when you want to get a more detailed breakdown of your categories, and what’s selling well and what isn’t.
To begin, you’ll notice a text box and a drop-down box, both will be automatically assigned to sort your reports by Product Type.
Using the drop-down box, select the category in which you want to sort the reports by.
The reporting field will then populate with the category, but if you want a specific category item, simply enter its name in the search box.
Name
The name of the Category Type
Sales Qty
The number of products within the category type that were sold.
Sales (ex. Tax)
Displays the amount of money that the store actually received during the time-period specified. Included discounts, refunds, cash/card/gift-card payments, and on-account transactions
Refunds
The total value of refunds given to the products within the category type.
Discounts Given
The total value of the discounts given to products within the category type.
Registers
The Registers report lists details of sales totals put through each register, assuming you have more than one register.
Search across all registers and across all outlets, making it useful to understand how much sales your staff are performing on each register.
You can use the search box to only have Hike display the details put through on a particular register.
Register (Outlet)
The name of the register where all transactions took place.
Sales (Ex. Tax)
Displays the amount of money the specified cash register received during the specified time-period. Included discounts, refunds, cash/card/gift-card payments, and on-account transactions.
Refunds
All payments returned, including taxed, processed through the specified register.
Other Discounts
All discounts of the total order, i.e. 10% discount of total receipt, process through the specified register.
Users Report
The Users report will list the details of sales totals put through by each user on Hike. It’s a great tool to have when comparing the sales performance of staff, or if you are running specific sales targets for your employees to reach.
You can use the search box to display the sales details of a particular user, by entering in their name.
User
The name of the User that processed the transactions, as seen in the row.
Sales (Ex. Tax)
Displays the amount of money the specified user processed during the specified time-period. Included discounts, refunds, cash/card/gift-card payments, and on-account transactions.
Refunds
All payments returned, including taxes processed by the specified user.
Item Discounts
All discounts off specific items, i.e. 10% discount off product A on receipt, processed by the specified user.
Order Discounts
All discounts of the total order, i.e. 10% discount off total receipt, processed by the specified user.
Customer Groups Report
Customer groups reports lists details of revenue and discounts put through by each customer group. You can use the search box to only display details of a particular customer group.
Group
The name of the Customer Group
Standard Discount
The standard discount that customers assigned to this group receive
Sales (Ex. Tax)
Displays the amount of money the was received during the specified time-period by the customer group. Included discounts, refunds, cash/card/gift-card payments, and on-account transactions.
Order discounts
All discounts off the total order, i.e. 10% discount off total receipt, received by this customer group.
Refunds
All payments returned, including taxes, received by this customer group.
On Account Reports
On Account Reports showcase the list of transactions that customers have put On Account and their outstanding totals.
Each On Account transaction will be reported separately, i.e. if a customer puts an item on account, and then puts another item on account, each order will be listed separately. You can use the search box to only display details of a customer’s On Account order, as searched by their name or transaction number.
Order #
The is the reference number for your On Account transaction.
Date
The date the order was first put On Account.
Customer
The customer the On Account is assigned to.
Order Total
The original amount of the On Account order.
Outstanding
The remaining amount of the On Account order that is to be paid.
Remember: You can export each of your reports into CSV or PDF files, to pursue at your leisure. You learn how to do this click here.
Inventory Reporting
Having real-time access to your store’s inventory levels allows retailers to stay on top of all their inventory requirements. Ensuring that you have enough stock of a product, so as to satisfy demand is a key part of running a well-operating business. The type of inventory reports you can expect to see in Hike include:
- Current Inventory
- Inventory Purchase
- Inventory Adjustment
- Cost of Goods Sold (COGS)
On this page, we’ll go through exactly what each report means and how to read them on Hike.
To begin, select Reporting from your Hike menu and navigate to the Inventory screen.
Here, you will find the Inventory Report screen where you’ll be able to go through the various reports by clicking on the multiple tabs.
Remember, you can always customise and filter your reports by using our Reporting Measures.
Let’s now look at those reports in a bit more detail.
Current Inventory Reports
Current inventory reports list the details of your current inventory. An easy way to glance at your stock and see not only how much you have on hand, but also the entire retail value of that product.
You can use the search box to only display the details of a particular product within the date-range selected.
Furthermore, you have the option to sort your products by their lowest inventory.
Simply TICK, the Show Low Inventory Items Only (that has reached reorder level) to have your reports only display those items – assuming you have set reorder levels on your Products in the Product settings.
Product
The name of the product/variant. i.e. shirt, size small.
Inventory
The number listed displays the available stock of that item, but by selecting the box, you will notice 3 units displayed for each of your store’s outlets, in order of:
- Current Stock Available
- Stock on Back Order, Layby or Parked
- Available Stock For Sale
Reorder Qty
The amount of stock that should be purchased, once stock levels hit the reorder point (if no settings were made, will default to 0)
Reorder Point
When stock levels for the product hit this point, it will trigger for you to reorder stock (if no settings made, will default to 0)
Unit Cost
The cost of the individual product unit, excluding any taxes.
Total Cost
The cost of the total inventory of product units held, excluding any taxes.
Retail Price
The retail sale price of the individual product unit, excluding any taxes.
Retail Value (Ex. Tax)
The retail sale price of the total inventory of product units held, excluding any taxes.
Inventory Purchase Report
Inventory Purchase Reports list details of all your Purchase order activity. You can use the search box to only display details of a particular Purchase Order number, within the date range selected.
PO#
The Purchase Order number.
Supplier
The supplier associated with the Purchase Order.
Qty
The original stock level ordered.
Qty Received
The actual stock level recorded as received.
Cost of Goods Sold (COGS)
The total cost of the stock on the Purchase order.
Inventory Adjustment Report
The Inventory Adjustment Report list details of changes to stock level activity, typically by when you adjust inventory in the Product details.
Date
The date of the inventory adjustment. You can sort the order as it appears on your report from latest to oldest, by clicking on the arrows.
User
The user that performed the inventory adjustment.
Adjustment Reason
Details which product was adjusted.
Change
What the adjustment amount was.
Opening
What the stock level was before the adjustment took place.
Closing
What the stock level currently is after the adjustment took place.
Cost of Goods Sold (COGS) Report
The COGS report list details of all the COGS sold. Use the search box to only display the details of a particular product within the date-range selected.
Item
The product name of the item sold.
Quantity Sold
The number of units of the product sold within the set time frame.
Sales (Ex. Tax)
Displays the amount of money the was actually received for the total sales of a particular item during the specified time-. Included discounts, refunds, cash/card/gift-card payments, and on-account transactions.
Purchase Cost
The cost price of the individual item, before tax.
Discounts Given
The monetary total of all discounts applied to that type of product.
Spillage / Lost Cost
The monetary total of all losses applied to that type of product due to refunds without returning goods or from inventory adjustments.
Gross Profit
Gross Profit = Revenue - COGS
Margin %
The percentage difference between the cost for acquiring products and the selling price.
Remember: You can export each of your reports into CSV or PDF files, to pursue at your leisure. You learn how to do this click here.
Register Reporting
Keeping track of the data coming out of your registers, can be a great way to help you identify your takings over a specified time-period. The type of register reports you can expect to see in Hike include:
- - Shift Report
- - Drawer Opened Without Sale
- - Voided Transactions
On this page, we’ll go through exactly what each report means and how to read them on Hike.
To begin, select Reporting from your Hike menu and navigate to the Register screen.
Here, you will find the Register Report screen where you’ll be able to go through the various reports by clicking on the multiple tabs.
Remember, you can always customise and filter your reports by using our Reporting Measures.
Let’s now look at those reports in a bit more detail.
Shift Reports
Shift reports list details of the activities recorded at each register during the end of a set shift. It’s an easy way to see your expected and actual takings, on any given day as well as any differences.
You can use the search box to display the details of a particular register within the date range selected.
Register (Outlet)
The name and location of the register this particular shift report relates to.
Note: Selecting the register’s name will open the Cash Register Summary. See below for more information.
Time Opened
The date and time the register was opened for the start of the shift.
Time Closed
The date and time the register was closed for the end of the shift.
Expected
The monetary amount, Hike calculated the total should be.
Actual
The monetary amount that the staff added up to have.
Difference
The monetary difference between the expected and actual values.
Cash Register Summary
As mentioned, by selecting the Cash Register you will open the Cash Register Summary. This table lists the totals for the monetary actions during the shift, with the name of the register/outlet, plus opening and closing times at the top of the page.
Cash Register Summary
Table lists totals of the monetary actions during the shift, with the name of the register / outlet, plus opening and closing times at the top of the page.
Total sales
This includes the full sale price (not the layby price); any refunds during the same shift reduces total sales, later refunds do not change daily total.
Payments
This is payments received, as opposed to sales, that is the actual amount received during the shift only, such as layby instalments and refunds paid during shift.
Tax collected
Total Tax during shift, regardless if tax is included in sale price or not.
Discounts
Total discounts offered during shift.
Tips/surcharge
Total tips or surcharges received.
Refunds
Total refunds offered during shift.
You will then be able to break down your register further by viewing these reports:
Payment Summary
Here you will see a table that break downs your takings by payment type.
Payment Type
These are the different ways customers can pay, broken down to help you confirm what cash, card, or other totals you may have.
Expected
Given the sales recorded throughout the day, this is the expected amount received during the shift.
Actual
This is the actual amount the staff counted as received, for each of the payment types.
Difference
The difference between the expected and counted amount.
Payment Details
Here you will see a table that lists the specifics of each transaction made during the shift.
You can use the drop-down box to select a payment type to see transactions for.
Date
The date and time of the transaction within the shift report.
Sale
The sale number or invoice number of the transaction.
Sale total
The full value of the sold item, regardless if it was fully or partially paid.
Payment
The actual amount received towards payment of the item.
Type
The method of payment, i.e. cash, card, store credit.
Use the drop-down box to filter between payment types.
User
The staff member that completed the transaction.
Add/Payouts
Here, the table lists the money added to or taken from the cash register. Also known as Cash In, Cash Out, here you will also see the opening and closing float figures.
Type
The type of entry added in or taken out, i.e. float, money in, money out.
Amount
the monetary amount, i.e. $100 towards the float.
User
The staff member that either, acknowledged the float, or took money out, or added in.
Notes
The written notes, if any, made in relation to money going in or out.
Transactions
Here, you will find a break down of each specific sale (and its status) that occurred in the register.
Transaction Date
The time and date the transaction took place.
Sale
The sale or invoice number of the transaction.
Status
Whether the transaction has been fully completed (paid in full) or if it is still being processed (Layby, On-Account etc.)
Customer Name
The name of the customer, if provided.
Discount
Any discounts applied to the total sale.
Sale Total
The total value of the transaction.
Amount
The amount paid by the customer for the transaction.
Drawer Opened Without Sale
The Drawer Opened Without Sale reports, lists how often the register was opened without a sale during the shift.
The Report will feature all Registers that had their cash drawer opened without a sale, as prescribed by the Cash Register column.
The number of times the register was opened during the shift, without a sale being processed will be displayed in the Opened Without Sale column.
By selecting the Cash Register, a new window will open that will display:
Opened By
The name of the User signed in at the time of the Cash Drawer being opened.
Date & Time
The Date & Time of when that was.
Voided Transactions
The voided transactions report lists all transactions that were voided during the shift. You can use the search box to only display details of a particular register within the date range selected.
Register (Outlet)
The name of the Cash Register that was used to void the transaction.
Total Void
The number of transactions that were voided during the shift.
Clicking on a specific Cash Register triggers a page to slide out, revealing in the table the following additional information.
Void By
The name of the user signed in at the time the transaction was voided.
Void Date & Time
The date and time the transaction was voided.
Sale
The transaction, or sale reference number.
Sold By
The name of the User signed in at the time the transaction was completed.
Sold Date & Time
The date and time the transaction was completed.
Remember: You can export each of your reports into CSV or PDF files, to pursue at your leisure. You learn how to do this click here.
Note: When you export any report on excel, you will get Total amount calculated automatically for each Column. The total of each column will be listed in Bold letters. This is available on all reports within Hike.
Related Articles
Understanding your Detailed analytics Reports.
Hike POS offers a comprehensive analytics report that provides valuable insights into various aspects of your retail business. Here are some key aspects of the detailed analytics report in Hike POS: You can access Detailed Analytics report under ...Hike Payment Reporting and Settings
Hike Payments Reports and Settings This article explains how to access Hike Pay reports and manage Hike Pay settings in Hike POS. These tools help you track payments, reconcile transactions, and control how Hike Pay operates in your store. What is ...Adding Customers & Customer Groups in Hike
Your customers are the lifeblood of your store, and as such they should be treated like your most valued assets. One way in which to ensure that, is to have a built-in customer database within your point-of-sale that allows you to manage, all ...iPad Printing reports
The iPad Hike POS Register app can print from Enter Sale and Sales History - all Point of Sale tasks. This will allow you to print receipts from current and existing sales to the linked thermal receipt printer that is connected to the iPad. PLEASE ...Run Custom Reports
Hike lets you customize the reports on sales, customers, and inventory. You can download the custom report straight away or schedule it to be generated and sent to your email later. This feature is supported under the Plus Plan. If you are using the ...