How to integrate QuickBooks Online with Hike
Currently, QuickBooks integration is a paid add-on with Hike Plus plan subscription. The QuickBooks online integration will not be available on Essential or Trial plans.
Please check the QuickBooks online add-on price for each region below for your reference. Per Hike-account fee. No additional charges based on outlets, registers, or users.
United States: US $10
Canada: CA $14
Singapore: SG $14
United Kingdom: GBP 8
India: INR 940
By pairing Hike and QuickBooks Online, retailers can forgo laborious manual data entry, with precise accuracy of your data, that goes directly from Hike to your QuickBooks Online account.
Hike offers seamless integration with QuickBooks Online to automatically sync the following records:
- Products, inventory
- Customers profiles
- Sales transactions, payments & Discounts given
- Credit notes, Layby & On account sales
- Purchase orders, Supplier profiles
- Stocktake, inventory change log
- Gift cards sales & redemptions (with proper liability allocation/reduction in QuickBooks Online)
- Loyalty points earned & used (with liability allocation/redemption in QuickBooks Online)
- Integration with QuickBooks Locations and Class
Note: If you’re using Hike on multiple outlets, you can link those outlets to separate QuickBooks Online organizations. Get accurate sales history and more automatically posted to QuickBooks Online for all your outlets.
Important steps before you begin
Before you start the integration, we strongly recommend you speak to your accountant to discuss the accounts you’d like to post data from Hike to QuickBooks Online. Please ensure that QuickBooks Online’s Chart of Accounts has all the accounts that you require for mapping, especially in relation to:
- Do you have a refund account already created in QuickBooks Online?
- Corresponding payment types in QuickBooks Online.
- Expense and liability account for loyalty points.
- Payment and liability account for gift cards.
- Revenue & COGS accounts designation for Inventory & non-inventory items.
- Asset account for inventory.
- Corresponding names for Hike payment methods in QuickBooks Online & related banking accounts.
Disclaimer: Throughout this article, we’ve made some suggestions regarding account types selection in QuickBooks Online, Chart of Accounts. However, those suggestions are only for tutorial purposes only. We strongly recommend you speak to your accountant to obtain professional advice before deciding on the accounts mapping criteria and selections for your business account.
Let’s start setting up the QuickBooks Online integration
You’ll set up the integration in 3 main steps:
Activate Hike & QuickBooks Online connection
- In Hike, open the Menu tab, and click on Integrated Apps >> Integrated Apps.
- From there you will find a list of applications to which Hike connects to. Integrate your QuickBooks Online account, by clicking on ACTIVATE to the right of the QuickBooks Online icon.
- If you have not logged into QuickBooks Online, you will be prompted to fill in your credentials. Enter your QuickBooks Online email or User ID and Password, and click Sign In. (Note: You may skip this step if you have already logged into QuickBooks Online using another web session).
- If you have logged into QuickBooks Online, you will instead be asked to approve QuickBooks access to your Hike store. Select your company on the next screen and click on NEXT (If you have more than one company linked to your QuickBooks Online account).
Note: If you want to make sure that your QuickBooks Online integration with Hike has successfully been activated, close the settings screen, and you’ll land back on Hike’s Integrations page. You’ll notice that next to the QuickBooks Online Integration row, the ACTIVATE option has been replaced with MANAGE, which means you have successfully activated the Hike + QuickBooks Online connection.
Enable Settings
The first thing you’ll need to do is enable certain options in Hike before you can start creating and mapping accounts.
To enable these options, we’ll need to access the Accounts and Settings page on QuickBooks Online, which can be reached by clicking on the Gear Icon, located on the top right of the page.
Enable Purchase Orders
Your Purchase Orders may read as OFF, but as we’ll be tracking our POs to and from our Suppliers, it’s important to have this enabled.
Once you’ve reached the Accounts and Settings page, select Expenses from the menu on the left, and select the Purchase orders row.
Turn ON the toggle button, located next to Purchase Orders, to have the row read ON and click Save.
Enable Shipping & Discounts & Deposits
Staying on the Accounts and Settings page, select Sales from the menu on the left to enable your shipping and discounts.
Select anywhere on the Sales Form Content box to open expanded options for your Shipping fields.
Turn ON the Shipping box, to enable it on your sales forms.
Turn ON the Discount box, to enable it on your sales form.
Click Save to finalize the process.
Set up GST
Set up your GST by going back to your Dashboard, and selecting GST from the menu.
From there, click on the Set-up GST button.
This will open a new dialog box for you to create your GST. Do as per your own requirements and click Next once done.
Creating QuickBooks Online accounts
Before we can start mapping the relevant payment, liabilities, and expenses accounts into Hike, we will first need to create the accounts that we will need.
There are two main steps to do this on QuickBooks Online:
- Create the full list of accounts you need to sync Hike with QuickBooks Online, with QuickBooks Online’s Chart of Accounts.
- Add the product service of your business using QuickBooks Online’s Products & Services page, ensuring that the correct income account is chosen for each product.
Note: For convenience, it’s best to establish all your accounts before you begin mapping, as you will need to refresh Hike in order to see the relevant accounts appear.
Here is an example of how you would complete both steps in lieu of creating a Store Credit account.
- First, navigate to QuickBooks Online Chart of Accounts by clicking on the Gear icon at the top right, and clicking on Chart of Accounts.
From the Chart of Accounts page, you will see a list of all your accounts, of which you’ll be able to filter through Assets, Liabilities, Expenses, etc. You can also use the search bar to find the account you want by name.
- To create a new account in QuickBooks Online you select New.
- A new dialog box will appear for you to create your new account. You can also edit an account, by selecting the dropdown box at the end of the account’s row (next to Account History) and selecting Edit.
- Once the dialog box is open, you’ll have several fields to complete, before you can add the account:
Category Type
As we are creating an account for Store Credit, the category type will be Liabilities.
Save account under
What type of liability is the account? In this case, we’ve labeled it as Other Current Liability.
Name
The name you want to give your account.
Description
You can add a short description of the account here.
Tax form section
You can select under which section you wish to show this entry (This will be useful to your accountant for filling up tax forms).
- Once you’ve completed filling in the relevant details, select Save to finalize the account.
- Next, you’ll need to add the product service for your Store Credit account using QuickBooks Online’s Products and Services Page.
- There are two ways to reach the Products and Services pages on QuickBooks Online:
- Visit your Dashboard, select Sales from the left-hand menu, and click on the Products and Services tab.
- Click on the Gear icon at the top right, and click on Products and Services under the Lists category.
- Click on the New button and then select Service, to begin adding your product service to QuickBooks Online.
- Begin the Product/Service Information by filling out the relevant details:
Name
The name of the product such as Store Credit.
SKU
You can leave this field blank.
Category
Add the category under which you wish to assign this product service.
Sales Information
Select the box "I sell this product/service to my customers" for all your new accounts.
Income Account
This is where you will link your Product Service to your Chart of Accounts. Enter or search for the corresponding name of your Chart of Accounts here. This will be what you map in Hike as well.
Purchasing Information
Leave this blank. This will only be applicable to select for your shipping accounts.
To complete, click on Save and Close
You will repeat the above steps for all your accounts, attributing the right account types – Liability, Expense, and Income to each.
Once you have each, refresh your Hike Store and begin mapping.
Map QuickBooks accounts
This is where we’ll map relevant account types in Hike to define how your data will be posted to QuickBooks Online.
For example, if you are selling gift cards in Hike, by mapping a QuickBooks Online liability account for it, you will be able to track the increase and decrease in your liability relating to gift card sales.
Primary Settings
Select how you’d like to sync sales transactions data with QuickBooks Online:
This is where you will select how you’d like to sync your sale transactions from Hike to QuickBooks Online.
Create individual (separate) invoice in QuickBooks for each sale:
This option is suitable if you prefer to sync each individual sale as an invoice in QuickBooks Online. It provides you with more visibility options into your transactions, however, it also adds many more transactions to QuickBooks Online’s sales transactions list.
Send one summary invoice to QuickBooks:
Sync your total sales summary for the day by simply posting totals to relevant accounts. The total transaction summary is sent to QuickBooks as one big sale invoice at the end of the day when you close your cash register in Hike.
Please note: Hike will always sync 'on account' sales as individual transactions even if 'Send summary by account' is activated. Also, when this option is enabled, Hike will not sync products & inventory with QuickBooks. Thus, the initial stock of products and any stock adjustment performed in Hike won't trigger any journal creation in QuickBooks.
What works best: Sync details invoice or summary?
It depends on your industry, business size, and what you wish to achieve from this integration. For example, some of our customers who run coffee shops, prefer to sync by sale summary as there are so many small transactions – mostly walk-ins with no customer details on the sale. There is little purpose for them to sync invoice details as it would unnecessarily clutter their Sales section in QuickBooks.
However, our users in the furniture industry, do prefer to sync with detailed invoices for each sale, as almost every sale has a customer associated with it, and the invoices sizes are comparatively large.
Common Customer Name for Walk-In Sales
Select a common customer name for walk-in sales. All cash/walk-in sales will be synced to QuickBooks online under this customer profile. Even though you won’t receive customer information to engage with them further if a generic name is used, you can still identify shopping trends, for all your walk-in customers.
Product Settings
Purchase (COGS) account for inventory items
This is your default cost of goods sold (COGS) account for inventory products. Your cost-of-goods-sold (COGS) refers to the expenses involved in creating or purchasing the products that your store sells.
Sales (Revenue) account for inventory items
Select a default sales/revenue account for your inventory products.
PLEASE NOTE: Hike also lets you set product-specific Revenue and COGS accounts for each of your products. However, if nothing is specified at a product level, the above default accounts will be used to post revenue and COGS amounts.
Inventory asset account
Select an asset account in QuickBooks Online for your inventory. This is where inventory movement will get recorded because of a sale, purchase, stocktake, or returns.
Sales (Revenue) account for non-inventory items
Select one of the revenue accounts from QuickBooks’ Chart of Accounts, to be populated here. This is the account you will allocate revenue/income generated, from the sales of products or services with inventory tracking disabled.
Purchase (COGS) account for non-inventory items
When you sell a non-inventory item, the costs associated with that item will be recorded in this account.
PLEASE NOTE: Hike also lets you set product-specific Revenue and COGS accounts for each of your products. However, if nothing is specified at a product level, the above default accounts will be used to post revenue and COGS amounts.
Accounts for Payments
Refund Product
Refunds are automatically posted to your Sales as negative values, using the ‘sales – refunds = net sales’ formula. However, when sales totals are less than the refunded amounts, it will result in the posting of a negative sales total for the day. QuickBooks Online does not allow for the creation of negative invoices. Therefore, anytime that the daily sales are LESS than the refund totals, Hike will post the refunds to the account you have specified here.
Cash Rounding Expense Account
Small cash rounding can occur with decimal values, tax calculations, and cash payments. For example, if an invoice total is $10.12 and the customer is paying with cash, it will result in a rounding of $0.02.
QuickBooks Discount Accounts
Please specify a corresponding account in QuickBooks Online for the discounts given to customers. You can either use a QuickBooks Online Revenue or an Expense account here.
Sale Product
Please specify a corresponding account in QuickBooks Online for the Sale product.Discount Product
Please specify a corresponding account in QuickBooks Online for the Discount product.Accounts for Liability & Expense
Store Credit Liability Product
Hike lets you create credit notes. Here you can map customer credits to the corresponding liability account in QuickBooks Online. Whenever store credit is redeemed by a customer, your liability will be reduced in QuickBooks Online.
Gift Card Liability
Using Hike’s gift card feature? Gift card sales are different from other products because they do not result in an income, unlike other products. With gift cards, you accept payments in exchange for the promise of providing goods and services later. As such, gift cards are recorded and posted to QuickBooks Online as a liability when sold. Your liability amounts are reduced when a customer redeems the gift certificate.
Loyalty Liability Product
Loyalty Expense Product
Accounts for Cash Management
Here you will be mapping for cash movements in Hike so that they will be posted into QuickBooks Online. Please note, an incorrect mapping may result in wrong amounts posting or QuickBooks Online may decline to sync the transaction.
Cash In/Out Product
Create an account to post additional cash that you add to or remove from your cash register.
Opening Float Account
Your opening and closing cash float will be recorded in this QuickBooks Online account.
Till Payment Discrepancy Account
When you close your cash register at the end of the shift/day, Hike will prompt you to enter ‘actual’ counted amounts against amounts ‘recorded’ as received. This account will be used to record any cash discrepancies between your actual cash takings and expected cash takings in Hike.
Tip Product
Suggested account type: Liability or Income
Do you accept tips? If so, here is where you will define its corresponding account in QuickBooks Online. The type of account will depend on how tips are processed in your business.
- Liability – Some Hike users record tips as a liability as they normally distribute them amongst their staff. When recorded, tips are added as a liability and the liability is reduced when tips are paid out to the staff.
QuickBooks Ship Product
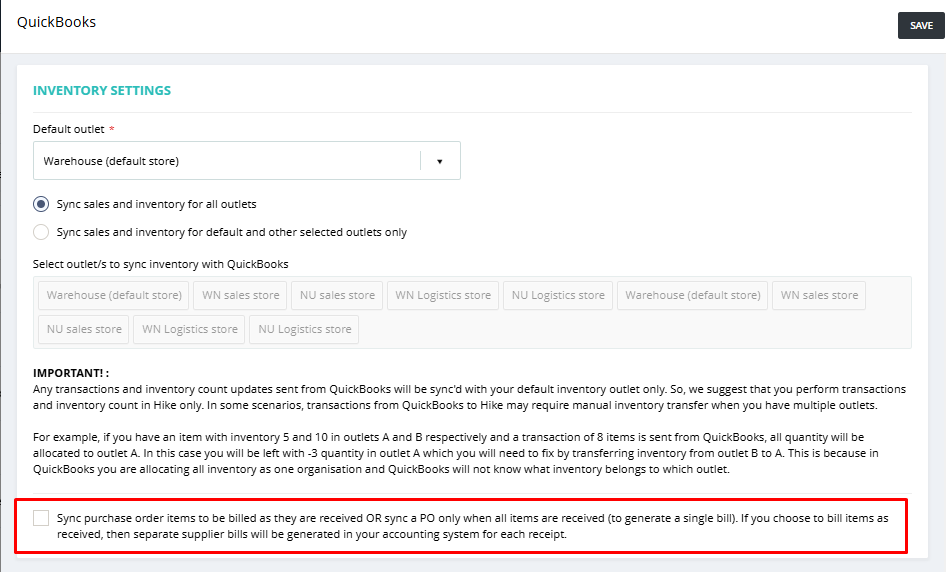
Inventory Settings:
When you activate the option below in the Hike - QBO integration settings, a separate bill will be generated each time you receive partial quantities. However, if you do not select this option, only one bill will be created when the PO order is marked as received.
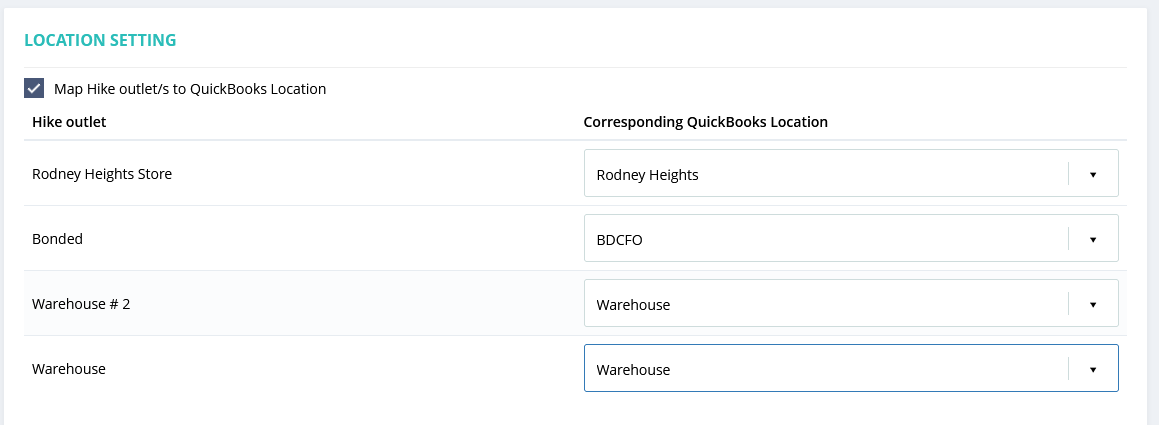
Location Setting

If you select the checkbox for location settings, you will have the option to map your locations with Hike outlets.
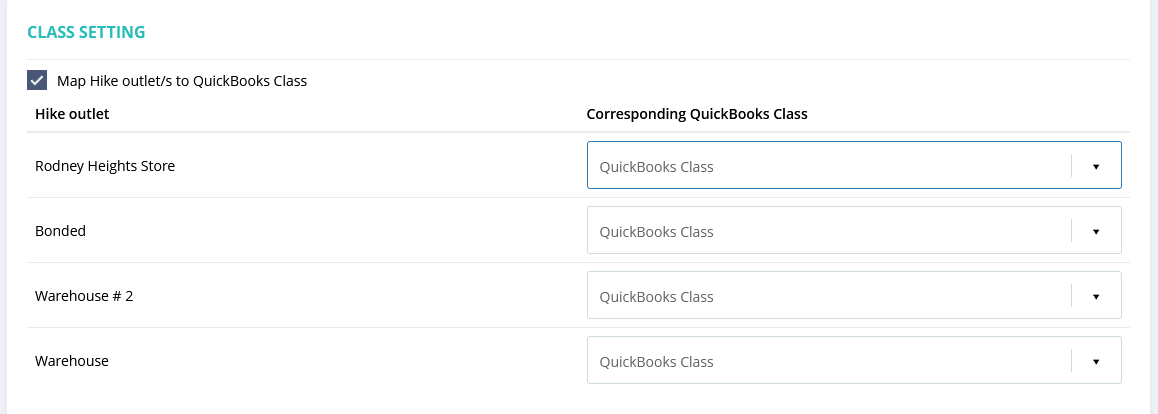
Class Setting:
QuickBooks allows the
creation of classes within one account. Classes represent meaningful segments
in your company. You can organize your customer and vendor transactions by
class. This lets you get clearer insights into your sales, expenses, or
profitability by business segment.
Hike will allow you to integrate with QuickBooks class with this feature.
You can map each Hike outlet with a different QuickBooks class to manage sales
and expenses.

Tax Mapping
If you select the checkbox for location settings, you will have the option to map your locations with Hike outlets.
Hike will allow you to integrate with QuickBooks class with this feature. You can map each Hike outlet with a different QuickBooks class to manage sales and expenses.
Here on the left are all the tax options available in Hike. Use the pull-down menus on the right to map corresponding sales and purchase tax rates in QuickBooks Online.
To update/change tax rates in Hike, go to Store Setup > Tax Rules. You will need to create the same tax rates in QuickBooks as well in order to map the tax between Hike and QuickBooks.
Payment Mapping
Every payment type in Hike must have a corresponding account in QuickBooks Online for transactions to sync properly. Normally, most Hike users would use a ‘Bank’ account type in QuickBooks Online as a corresponding account for payments. However, some retailers prefer to send payments to a Clearing Account first before reconciling.
Sync Settings
This is where you’ll select how your data is synced and managed between Hike and QuickBooks Online.
There are 5 types of data that can be synced: Customers, Products & Inventory, Sales, Suppliers & Purchase Orders.
We’ll explain how each can be synced to and from Hike, with examples, below:
2-way
Selecting this option will allow you to sync your data to and from Hike and QuickBooks Online. For example, by selecting 2-way for Customers, all your customer information will be shared between the two platforms. A new customer added to QuickBooks Online will be automatically synced with Hike, and vice-versa.
Hike -> QuickBooks Online
Select this option if you want your data to be ONLY sent from Hike to QuickBooks Online. For example, by selecting Hike -> QuickBooks Online for Products & Inventory, all your Products & Inventory data WILL be shared from Hike to QuickBooks Online, but NOT from QuickBooks Online to Hike. Adding a new product in Hike will automatically sync and appear in your QuickBooks Online dashboard but creating a new product in QuickBooks Online will not appear in Hike.
QuickBooks Online -> Hike
Select this option if you want your data to be ONLY sent from QuickBooks Online to Hike. For example, by selecting QuickBooks Online -> Hike for Sales, all your sales information WILL be shared from QuickBooks Online to Hike but not the other way around.
No Sync
Select this option if you do not wish to sync data between Hike and QuickBooks online.
Product Sync Preference
Hike uses a product (Stock-Keeping Unit) as a unique identifier for your products. This is standard practice for most leading accounting, POS, and eCommerce platforms within the retail industry. However, some accounting applications do not require products with SKUs, thus leading to some products without SKUs. To solve this discrepancy Hike lets you choose one of the following two options:
Sync non-SKU products to Hike and auto-assign SKU numbers.
Selecting this option will trigger Hike to automatically create SKU numbers for products that are being synced from QuickBooks, but do not have an existing SKU.
Do not sync non-SKU products and their sales orders.
Selecting this option will NOT sync products from QuickBooks that do not have SKUs. Enabling you to manually create them first in your integrated platform.
Save
Once you’ve completed all the necessary steps, it’s time to save and start syncing. Click on the SAVE button either at the top or bottom of the page, to go on.
Hike Tip: If the Save button is greyed out, it means you have not completed a step. Ensure you have completed everything on the page, before moving on.
Hike Recommends: If you haven’t already spoken to your accountant, Hike strongly recommends that you do before commencing the preparation of your QuickBooks Online account for Hike integration. QuickBooks Online requires complete integration when connecting the two applications. That means, if any piece of data is incorrect, all will be rejected. For example, if you performed the end-of-day sync, and one item had an error syncing, all data would be rejected.
Related Articles
How to Activate QuickBooks Online Plus with Hike
If you want to know how to activate QuickBooks Online Plus to Hike, you’re in the right place. Hike enables you to integrate with QuickBooks Online Plus* to manage inventory, customers, suppliers, and purchase orders. *Note: Intuit QuickBooks offers ...How to Integrate QuickBooks Online Plus - first time setup, Sync Settings
If you want to know how to connect QuickBooks Online Plus to Hike, you’re in the right place. Hike enables you to integrate with QuickBooks Online Plus* to manage inventory, customers, suppliers and purchase orders. *Note: Intuit QuickBooks offers a ...How to Manage QuickBooks Online Plus - Manual Sync
Hike enables you to integrate with QuickBooks Online Plus* to manage inventory, customers, suppliers, and purchase orders. *Note: Intuit QuickBooks offers a range of online services, but only QuickBooks Online Plus allows integration with Hike. When ...How to Manage QuickBooks Online Plus - Sync Process Log
Hike enables you to integrate with QuickBooks Online Plus* to manage inventory, customers, suppliers, and purchase orders. *Note: Intuit QuickBooks offers a range of online services, but only QuickBooks Online Plus allows integration with Hike. When ...How to Manage QuickBooks Online Plus - Error Log
Hike enables you to integrate with QuickBooks Online Plus* to manage inventory, customers, suppliers, and purchase orders. *Note: Intuit QuickBooks offers a range of online services, but only QuickBooks Online Plus allows integration with Hike. When ...