Adding Customers & Customer Groups in Hike
Your customers are the lifeblood of your store, and as such they should be treated like your most valued assets. One way in which to ensure that, is to have a built-in customer database within your point-of-sale that allows you to manage, all existing and new customers as they come to your store.
From the onset, we at Hike POS, have designed a system that’s perfect for your customer management needs, because hey, we were once retailers too! Our wide range of features include:
- Ability to add new customers on-the-fly.
- Import any existing customer directories.
- Customer profiles available to shoppers in-store and online
- Gain valuable insights into customers transaction histories and shopping trends.
Grow your business with Hike’s built-in Customer database functionality today!
- Customers Overview
- Customer Profile Overview
- How to Edit & Delete a Customer in Hike
- Creating a Credit Limit for a Customer to Purchase ‘On-Account’
Customers Overview
There are various components in the Customers Section to understand, so before we look at how to add new Customers, let’s take an overview look at the Customer Page in Hike, to get ourselves familiarized with the section.
To begin, select Customers on the Hike menu and navigate to the Customer's screen.
This is where you’ll all the customers who are in your system. You’ll also be able to find and search for customers – useful if you need to edit any of their details – as well as add new customers, import new customers from existing databases.
FIND…
You can search for a customer by either entering in their First Name or Last Name.
IMPORT/EXPORT
Here you will either import your customer database or export your existing database on Hike to/from a Excel file.
+ ADD CUSTOMER
The +ADD CUSTOMER button, triggers a new dialog box to slide out, where you will be able to create your new customer.
Customers List View
The Customers List View is in reference to the columns occupying the Customers section. Below we’ll go through what each column means:
Customer
The name of the Customer. Hike recommends you at least ensure you have a full name when adding a new customer.
Company
The Company of the Customer, if listed.
Email
The Email address of the Customer, if listed.
Location
The Location of the Customer, if listed.
How to Add a New Customer in Hike
Hike gives retailers a built-in customer directory, that builds businesses with meaningful information on their valued shoppers.
To add new customers into Hike, you can do so in two different ways:
- You can add customers in the Customers section, accessed via the Hike menu.
- You can add customers directly on the Enter New Sale screen, during the checkout process.
Here, will explore the steps you need to take, to add a customer in Hike’s built-in Customer’s tab.
Find out more about adding a customer directly in the Process sale Screen here.
To begin, select Customers on the Hike menu and navigate to the Customers screen.
Click on the +ADD CUSTOMER button to start adding in your new Customer.
From here, a new Customer form will load, giving you a complete range of customizable details to create a customer, to add to your database.
Let’s go through the from, section by section.
Explanation of Fields
When you are creating your new customers, Hike will prompt you with these fields to add details to your customers. Only the First Name is mandatory, however Hike would recommend getting at least a Surname and/or an email address to make the customer easier to look up.
First Name
This can be up to 50 characters long. Note: This is a mandatory field.
Surname
Can be up to 50 characters long.
Gender
Defaults to male if no gender is chosen.
Date of Birth
A field for DOB. However, it is not necessary to use this as a birthday section, but rather as a calendar to record any other key date.
For example, you may want to use this section to record when the customer joined.
Company Name
Can be up to 50 characters long.
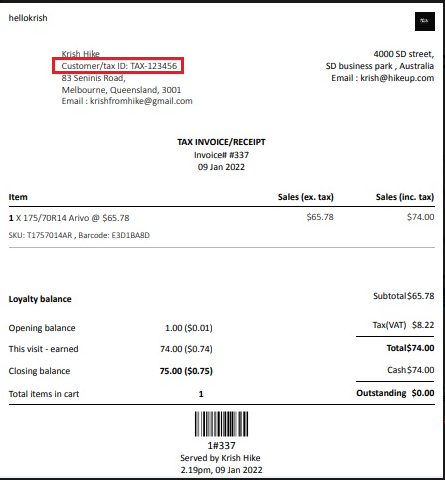
Customer/Tax ID
In some of the countries, it is standard
practice to add customer’s Tax ID in the receipt. To include this, we have
added this option in Customer profiles and Receipt templates. This option helps you display a customer’s legal ID wherever it is required. This option will allow you to assign a Tax Number or registration number of the customers in their profile and then have this information printed out in the receipt if required.
Now, whenever you will process a sale assigning the customer in which Tax ID is added then that Tax ID will also print in the receipt as shown in the below screenshot:
Customer Group
Can assign to group with pre-set discount rate. If no group is assigned, the Customer will be created under Retail (default) group. All un-assigned customers will create under this group. This is explained further in Customer Groups
Email
This must be in the format of name@XX.YY. However, Hike does not need it to be verified as a legitimate email address.
Yet, adding an email address is a great way to ensure you don’t have duplicate customers. If same email has been used for another customer, it cannot be used again.
Note: Hike & third-party programs use email to sync. If no email is added, the entry may be duplicated.
Phone
No preset requirements, any special characters may be used.
Street Address, City/Suburb, State/Territory, Postal/ Zip Code
The above can be up to 50 characters long.
Secondary Email addresses
If your
customer has more than 1 email address, you can now incorporate them in Hike.
We have provided
option to add secondary email address on customer profile page where you can
add up to two secondary emails.
Country
Select your country from the drop-down list.
Customer Code
This is not used by Hike, it will only appear here, but it available for third-party applications that need a customer code to sync.
Credit Limit
Enter the value of the credit limit issued to a customer here.
Customers can obtain goods, up to this credit limit, and will need to pay it back at a later date.
This is explained further in the article, Provide credit limit for Customers.
How did you hear about us?
Select from the drop-down list.
Notes
Any extra information you want to provide about the customer. There are no character limits.
An example of what a completed Customer form would look like.
Once you are done, click on the SAVE button to finalize the customer profile, and you will be taken back to the Customers page.
To view a detailed overview of a profile, simply click on the customer’s name in the Customers section.
Adding a New Customer in Hike Using the Process Sale Screen
As mentioned previously, Hike offers retailers two ways in which to add a customer.
The second way is to add a customer directly at the Process Sale screen, during the checkout process.
Find out more about adding a customer using the Customers page in Hike.
To begin, select Point of Sale on the Hike menu and navigate to the Process Sale screen.
Proceed to complete a quick sale as usual, by selecting the items in the transaction into the cart.
However, prior to clicking on PAY, click on ADD CUSTOMER located at the top of the receipt.
You will then be prompted to either FIND the Customer – if he/she is an existing customer on the Hike Database – otherwise select ADD NEW CUSTOMER.
Once selected, you will be taken to an Edit Customer Form where you will be able to fill in the customer’s details as before.
Click SAVE, and the Customer will now appear at the top of the receipt.
Proceed with the sale as usual. Once you have completed the sale you can always view the Customer’s Details by going to the Customers List View (Customers > Customers) and selecting on the customer’s name.
Customer Profile Overview
When selecting a customer using the Customers List View, Hike will give the retail a number of details surrounding the Customer’s transactions.
To get a better understanding of these figures and dates, let’s see what it all means.
To begin, let’s start by looking at the left section of the screen first, which contains general information pertaining to the Customer.
You will notice that this section also includes the EDIT button which will enable you to change any information as necessary. Also included on the left, is the various retail indicators about the customer’s financial obligations to the store:
These are:
Loyalty Points
The number of loyalty points, the customer has accrued.
Credit Balance
The monetary amount the customer can spend in-store.
This is often used in cases where customers are given store-credit, instead of a cash refund.
Avg. Purchase
The total value of purchases, divided by their total number of visits.
Total Purchase
The total purchases over their lifetime of being a customer.
Credit Limit
The monetary amount, if any, the customer may purchase on account.
Outstanding
The monetary amount, if any, the customer has purchased on account that is unpaid.
Visit this month
How many times the customer has visited in the current month.
Avg. Monthly Visits
Total store visits divided by how many months he/she has been a customer.
Order History
The sales history on the right shows past customer transactions.
If on Account payments are outstanding, you will see BULK PAYMENTS button to click on to complete payment.
Find out more about Bulk Payments and Managing Credit Limits for Customers Who Purchase on Account
FIND
The FIND drop-down menu will enable to you to filter the previous sales history via its sales type, i.e., Completed, Parked, Lay-By, On-Account etc.
The rest of your sales History contains your past transactions which you can sort by Date, Sale Number, or Sale Amount.
How to Edit & Delete a Customer in Hike
Edit Customers
To Edit a customer’s details, simply click on the Customer’s name, that you wish to edit the details of in the Customers page in Hike (Customers > Customers).
Once you’ve opened up the customer’s page, you’ll see an EDIT button located next to your Customer’s Personal Details. Click on the button.
That will bring up an Edit Customers page, where you’ll be able to edit the customer’s details as necessary.
Click on SAVE to finalize the changes.
Delete Customers in Hike
Deleting the Customers is much the same as editing the customers, only when you open up the Customer’s profile to EDIT, select the DELETE THIS CUSTOMER, located at the bottom left of the screen.
A pop-up will then appear asking if you want to permanently delete the customer. Click on YES to continue.
Note: Whilst you can use these instructions to delete a customer from Hike, if you have integrated with a third-party application, you may need to delete the customer’s records from that program as well.
Creating a Credit Limit for a Customer to Purchase ‘On-Account’
‘On-Account’ Purchases in Hike, means that having an account with Hike, allows shoppers to put items on credit and pay the balance at a later stage. Just like you if you have a credit card, where you pay the balance at a later stage – perhaps monthly.
Retailers use ‘On-Account’ sales in scenarios where they sell office supplies to a local business, or run a staff cafeteria, where purchases can be made, goods taken, and then settled later.
With Hike, you can set up individual customers to be able to purchase items ‘on-account’, then repay that account at a later stage.
Important:
- This post explains how to create a credit limit for a customer to purchase ‘On-Account’.
- If you want to learn how the customer will repay their credit limit, check out our post: ‘Managing a Credit Limit for a Customer’.
- If you want to learn how a customer will make a purchase; on-account’ with their credit limit, check out our post: ‘Place a Hike Sale on Account’.
Activate on Account Sales
In creating your credit limit for a customer to purchase using the ‘On-Account’ feature, you will first need to ensure that you have enabled it.
To begin, select Store Setup on the Hike Menu and navigate to the General screen.
Scroll to the General Rules section of the page, and to find the option ‘On-Account’ sales option.
Tick the option to enable ‘on-account’ sales. As mentioned, this is when a sale occurs, but the payment is not collected at the time of the transaction, rather the customer will be able to take goods and arrange a payment/s at a later time.
Click SAVE at the bottom of the right of the screen to complete the changes.
Set Credit Limit for On Account Sales
Now that you have activated ‘on-account’ sales for your business, it’s time to add a credit limit for your customers.
Before you start, you’ll need to ensure that the Customer’s account, who you to set a credit limit to, has been created or you are in the process of creating.
To begin, select Customers on the Hike menu and navigate to the Customers screen.
Either add a new customer by clicking on the + ADD CUSTOMER button, otherwise select (or search) for the existing Customer and click on their name.
Once you have opened the Customer’s profile, click on EDIT to set their credit limit.
Enter the monetary amount you wish the customer to have in the CREDIT LIMIT field.
Click on SAVE to proceed.
Now, the customer can purchase at any time, up to the limit that you have set, when you enter in an ‘On-Account’ payment, in the Process Sale Screen.
Now, to find out how your customer will settle their accounts.
Managing a Credit Limit for a Customer to Purchase ‘On-Account’
Once you have made a sale using the ‘on-account’ feature in Hike, there will undoubtedly come a time when your customers need to settle their account.
There are several ways in which retailers can reconcile any ‘on-account’ payments in Hike:
- Via the Sales History screen, whereby customers can pay off each ‘on-account’ sale in full.
- Via the Customers screen, whereby customers pay bulk pay their ‘on-account’ sales.
In this post, we’ll go through each method so that your customers can pay off their ‘on-account’ sales in full, or in payments using Hike’s Bulk Payment function.
But first, let’s look at an easy way to gain a full breakdown of your ‘On-Account’ sales using your Reports in Hike.
Viewing ‘On-Account’ Sales via Reports in Hike
Once you have completed ‘on-account’ transactions, you can look at that sale, and other ‘on-account’ sales, in your Reports section in Hike.
To do this, select Reporting on the Hike menu and navigate to the Sales screen.
Once you’ve landed on your Reporting screen, select the ON ACCOUNT tab, which will let you view all ‘on-account’ sales that have been created.
Note: You will need to select the date range as appropriate.
Another way exists in which to view your ‘on-account’ sales history, and this is through the Sales History section, where you will also be able to pay-off individual transactions in full.
Reconcile an ‘On-Account’ Sales via Sales History
Customers who pay using ‘on-account’, may elect to pay off the sale in full. If that is the case, using Hike’s Sale History section.
To begin, select Point of Sale on the Hike menu, and navigate to the Sales History screen.
To search for all your ‘On-Account’ sales, use the drop-down box (default will keep it at All Sales) to select On Account.
This will show all your ‘On Account’ sales.
Use the filter box to search for a specific customer, cash register, sale number or barcode number.
Note: You will also need to select the date range as appropriate.
On Account Sales History List View
In your Sales History List View, you will be able to the on-account’s:
Date
Date of Purchase
Sale
Sale Number
Source
Whether the ‘on-account’ sale was placed in-store or online.
Customer
The customer who made the ‘on-account’ purchase.
Fulfillment Status
Whether the order has been fulfilled. i.e. On Account, Pending, Completed.
Payment Status
Whether the payment has been Completed or if it’s still Pending.
If pending, you will be able to fulfill the payment by selecting Pay. More on that below.
Sale Total
The total cost of the sale.
Paying ‘On-Account’ Sales via Sales History
If a customer is ready to pay the full amount of an ‘on-account’ sale, or if this is the agreement between you and your customer – then selecting PAY in the Payment Status will achieve this.
Simply click on PAY on the ‘on-account’ sale you wish to reconcile.
Once selected, this will take you back to the Enter New Sale screen, where the sale will be automatically populated in the Receipt.
Click on PAY to complete the sale as normal and finalize the ‘On-Account’ payment.
Reconcile an ‘On-Account’ Sale via Bulk Payment
Customers can also choose to Bulk Pay their ‘On Account’ sales, whereby they can make payments in installments.
To perform this function, you will need to bring up the Customer’s Account.
Once you have selected your customer (from the Customers List View) click on BULK PAYMENT next to the Customer’s Sales History.
Pay Customer’s Account
Clicking on BULK PAYMENTS will open the Pay Outstanding Invoices screen in Hike.
For the customer to complete the payment of outstanding invoices on account, you will need to complete the relevant fields.
Total Payment
How much is the customer going to pay off? Enter that value here.
Select Register
Select the Register in which the payment will be completed in.
Select Payment Type
Select whether this is a Cash or Card payment transaction.
Note: If you have multiple on-account sales to be reconciled, when you enter a value in the Total Payment box, Hike will use that to pay the oldest sales first. You can always edit those figures, however you're Paying Now figures should equal your Total Payment.
Once you are satisfied, select APPLY PAYMENT. A pop-up box will appear asking you to apply & save the batch payment. Click on YES to continue.
You will be able to print out a receipt following that.
To completely reconcile the payment, simply follow the steps again.
Related Articles
Creating & Assigning Customer Groups (Tiers)
Customer groups are a popular way for retailers to set different levels of prices and/or discounts to a specific set of customers. These groups might include: VIP Customers Wholesalers Cross Promotion with Members of a Club First 100 Customers Retail ...Importing Customers via Excel File
Importing your Customers via Excel file When businesses are moving to Hike POS, rather than having to manually create all their data – products, customers & suppliers – it may be preferable to have all information stored onto a spreadsheet, that can ...Performing Sales in Hike
Different businesses will undoubtedly have different ways in which they conduct sales. From utilizing functions such as Lay-By to allowing your customers to pay for goods in installments or enabling on-the-spot discount sales for those specially ...Creating & Using Discount Offers in Hike
Amongst the various ways in which retail stores attempt to enhance and promote their business is through the power of discount offers. And through retailers look to discounts as an opportunity to attract new customers (which it is), the benefits of ...Customer Groups (tiers)
Customer Groups (tiers) You can set different levels of price to your customers based on which group they are in. If your customer is made part of a particular Customer Group, they will get different types of discount off all items they purchase. ...