Pick and Pack Fullfillment
Pick and pack fulfillment is a process in which a business receives
orders for products, and then selects, packs, and ships those products
to the customers who placed the orders. Pick and pack involves two processes — picking
and packing.
The Pick part of the process refers to selecting the products from
the warehouse or inventory to fulfill the order. This is typically done
by a warehouse worker who scans the bar-code to identify the products.
The Pack part of the process refers to packaging the selected
products for shipping, which usually includes preparing the shipping
label, and any additional packaging materials such as bubble wrap or
packing peanuts.
This feature is useful for businesses where delivery/pick-up area for the customer is far from the register (selling station), or businesses where online sales are packed and delivered from the offline store.
This feature is useful for businesses where delivery/pick-up area for the customer is far from the register (selling station), or businesses where online sales are packed and delivered from the offline store.
With Hike pick and pack feature, you can confirm the product and scan it before shipping it for delivery.
You will find the option of pick and pack on the sales which are 'Awaiting fulfillment' status. This status is available for the last stage of Parked and Lay-by sales.
When you open the sale from Sales history, you will see the Pick and Pack option for the sale.
By clicking on this option, you will be on the slider page where you need to scan the products via bar-code scanner or manually enter quantity of the product to complete the fulfillment.
You have option to partially fulfill the order. For example, you only have one available in stock out of two products. In this case, you can partially complete this sale via Pick and Pack and print the receipt. When the remaining stock is available, you can complete the sale with the remaining products.
You will be able to see the partially fulfilled quantity on the Pick and Pack option under these sales.
When you will print the delivery docket receipt, the Quantity column will show the outstanding stock.
For example, in the sale if the 5 products were sold and 2 were picked up already, the delivery docket will mention 3 pending quantity.
When you will print the delivery docket receipt, the Quantity column will show the outstanding stock.
For example, in the sale if the 5 products were sold and 2 were picked up already, the delivery docket will mention 3 pending quantity.
Once you scan the products it will update the Quantity on the box or you can add quantity of products. If correct, you can go ahead and Save and Print the sale which will complete the sale in Hike.
You can check the status of the sale in the Hike sales history.
You will need to select the following option in General settings if you wish to allow fulfillment from different locations.
Moreover, you will also be able to fulfil the sale from a different location. If you have multiple locations, the system will ask you to confirm the location for the stock update.
Moreover, you will also be able to fulfil the sale from a different location. If you have multiple locations, the system will ask you to confirm the location for the stock update.

If not selected, you can only fulfill the sale from the same location where it was created.
Moreover, there is a general setting where you can select the option to park each sale for fulfillment. Pick and pack option will only available for the Park, Lay-by and status with Awaiting Fulfillment status.
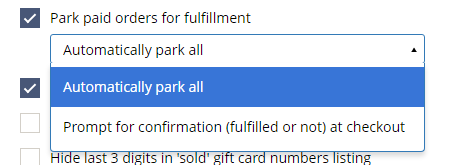
Moreover, there is a general setting where you can select the option to park each sale for fulfillment. Pick and pack option will only available for the Park, Lay-by and status with Awaiting Fulfillment status.
This feature is available on Web (PC, Mac) at the moment. The supported Hike plan in Plus.
Related Articles
How to integrate Shippit with Hike eCommerce for your shipping needs
Introduction: Hike integrates with Shippit seamlessly for your eCommerce Shipping needs Shippit is Australia's leading multi-carrier shipping software. Shippit works in Australia, New Zealand, Singapore and Malaysia to solve your complex fulfilment ...How to integrate Shopify with Hike
Hike offers built-in integration with Shopify. Connect your Hike store with Shopify to seamlessly integrate your in-store Hike POS and Shopify’s eCommerce store. Note: According to the recent update from Shopify, the Shopify Basic plan will not share ...How to integrate WooCommerce with Hike
Hike offers built-in integration with WooCommerce. Connect your Hike store with WooCommerce to seamlessly integrate your in-store Hike POS and WooCommerce eCommerce store. This will give you complete control of your data, including: Product details & ...How to integrate BigCommerce with Hike
Hike offers built-in integration with BigCommerce. Connect your Hike store with BigCommerce to seamlessly integrate your in-store Hike POS and BigCommerce eCommerce store. Integrating the two will give you complete management control of the data ...How to Integrate Ecwid with Hike
Hike offers built-in integration with Ecwid. (It's coming soon.) Connect your Hike store with Ecwid to seamlessly integrate your in-store Hike POS and Ecwid's eCommerce store. Integrating the two will give you complete management control of your ...