How to Configure Westpac (EFTPOS Now with Presto) with Hike
You can use the supported Westpac terminal with your PC, Mac, iPad or Android tablet. The terminal supported is Verifone T650P ( EFTPOS Now with Presto). However, before starting the pairing process, please make sure:
- The card processor is connected to the same Internet as your PC, Mac, iPad or Android tablet.
- Your terminal is of the updated version, to check this you can press
“Enter + 8” on your terminal for 2 seconds. The latest App version
should be V2.6.11
- If your device is not on the latest version, please press “Enter +
1” on your terminal for 2 seconds, press “Menu”, and press “Load
Params”. it will start downloading the latest App version.
Configure Westpac with PC/Mac
Please follow the step-by-step instructions below.1. Log in your Hike account --> go to Store set up -->Payment types --> add a new payment type --> select Simple Payments Integration as payment type --> click “Save". You can choose to apply the payment to all registers or a specific one. We also recommend you to name them differently if you use multiple Westpac terminals in your store.
2. Once above payment type is created, you will see it listed in the payment type page in Hike click on "configuration required" --> it will direct you to below page.
- If your device is not on the latest version, please press “Enter +
1” on your terminal for 2 seconds, press “Menu”, and press “Load
Params”. it will start downloading the latest App version.
- Please first choose your payment provider (acquirer)
- You can name your POS as the name you like
- Enter the Serial Number showing on the device into the field “EFTPOS S/N”
- Enter the IP address showing on the device into field “EFTPOS address”
- In the configuration page, you will see the option "Auto IP
resolution". Ticking it means you are allowing your device to
automatically look up the IP address. Alternatively, you can un-tick
this option and enter the EFTPOS address manually. We recommend using the "Auto IP resolution".
- In the configuration page, you will see the option "Auto IP
resolution". Ticking it means you are allowing your device to
automatically look up the IP address. Alternatively, you can un-tick
this option and enter the EFTPOS address manually. We recommend using the "Auto IP resolution".
- 3. Once entered the details, click on “Save”
4. Once saved, on the terminal press “Pair with POS” first, then click “Pair” in Hike, it will try to pair.
5. In both Hike and the terminal, you will see the code matching confirmation like below, select “Yes it matches” in the terminal.
6. Once done, it should show Paired in Hike and the terminal.
Configure Westpac with iPad or Android Tablet
Please
first make sure that your iPad or Android tablet is using the latest
version of the Hike app, and follow the instruction below. Please note,
the screenshots included below are taken on an iPad, while the interface
would be the same on an Android tablet.
- Login
to your Hike account on your PC/Mac. Go to Store set up -->Payment
types --> add a new payment type --> select Westpac Group Payment
as payment type --> click “Save". You can choose to apply the payment
to all registers or a specific one. We also recommend you to name them
differently if you use multiple Westpac terminals in your store.
- Login
to your Hike store on your iPad or Android tablet. Please make sure you
are visiting the register to which the payment was assigned. Go to
Settings --> Payment types, and check whether what you created is
appearing in the list as you set it up. If not, please go to Settings
--> General settings and click on "Data Sync".
3. Click on "Configuration required" beside the payment you set up and the
configuration window will slide out. Please input the IP address of the
Westpac terminal into the field of EFTPOS Address. You can choose
whether to print the merchant copy on EFTPOS here. If you choose not to,
the merchant copy will be printed from the receipt printer you have
connected with Hike on the iPad. It is not to print on the EFTPOS by
default. After setting it up, please click on "Save".
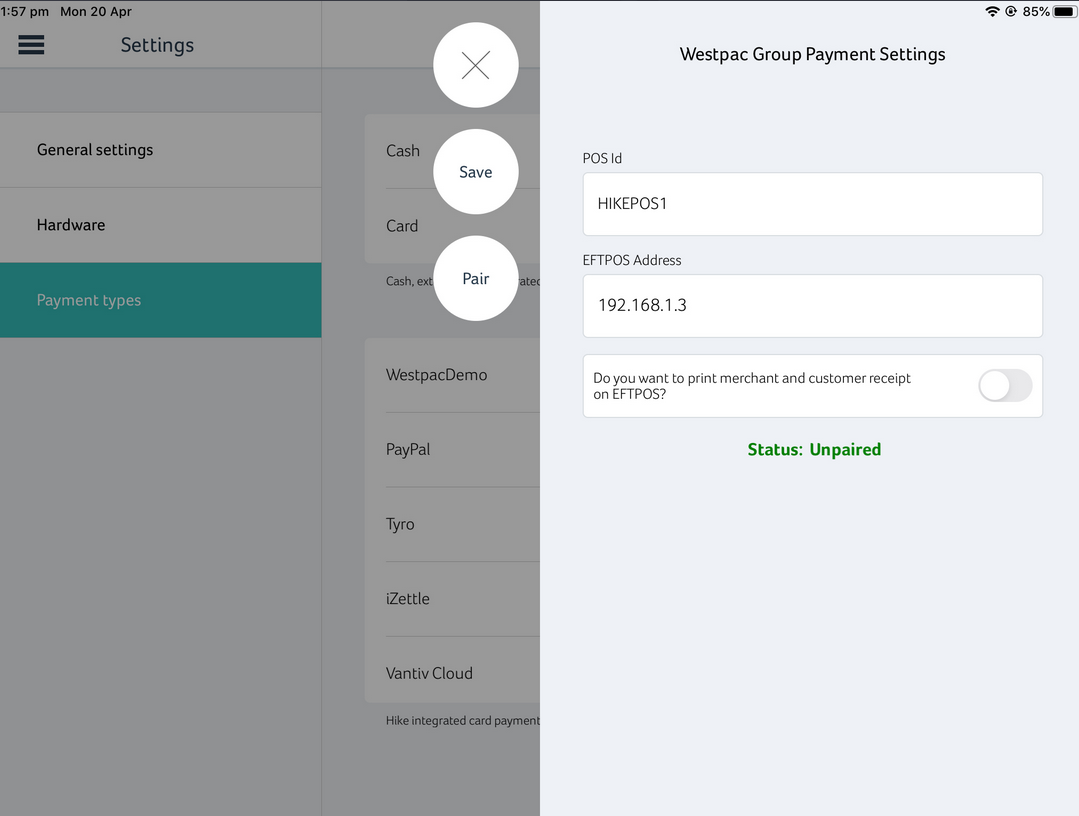
- Click on "Pair with POS" on
the Westpac terminal. After it shows Start POS pairing on the terminal,
click on the "Pair" button in the Hike App. Wait for a while and you
will find confirmation windows on both the Westpac terminal and your
tablet. Compare the codes. If they are the same, please click on yes on
both the terminal and tablet.
- Last, click on the "OK" button, and then the x button on your iPad to finish the integration. Now it should say Connected to "XXX" on your Westpac terminal, and Ready to use in the Hike app.
Related Articles
How to Configure Simple Payments Integration Gateway based Payment Acquirers with Hike
You can use this method to connect all payment devices using Simple Payments Integration Gateway. This includes, all of the following: CommBank EFTPOS Now Fiserv Australia Next Payments Till Payments Westpac Presto Herewith we've included an example ...How to Integrate Commenwealth Bank Payments (CBA) with Hike
Hike integrates with Commonwealth Bank Payments in two different ways. 1. Using Simple Payments Integration Gateway. 2. Using Linkly payment gateway 1. Integrate Commonwealth Bank payment type using the Simple Payments Integration Gateway. The ...How to configure Hike with Afterpay Barcode/QR
The Afterpay integration is supported on PC, Mac, iPad and Android tablets and is required for Afterpay's barcode/QR solution. This integration is supported in Australia and New Zealand. The instructions below is suitable for PC and Mac users. ...How to configure Hike with Tyro - Australia
You can use the supported Tyro terminal, Yomani XR, with your PC, Mac, iPad or Android tablet. It's supported in Australia only. Configure Tyro with PC/Mac Please follow the step-by-step instructions below. Log in your Hike account > go to Store set ...How to Configure Hike with Clearent
You can easily configure the integration between Hike and Clearent EFTPOS machines. This payment type is available in the US region. Before you start the process, please make sure your terminal is connected to the Internet. The terminal supported is ...